Last Updated: 2nd October 2019
Introduction
This article will give an explanation of the Teams Call Queues (CQ) and Auto Attendants (AA) - what they are and how to set them up.
You could previously create and administer the “SfB” CQ and AA in the (legacy) Skype for Business Admin Centre, but these have now been migrated as “Teams” CQ and AA in to the Teams Admin Centre.
There are some key differences between the two versions that I will highlight:
| SfB CQ and AA | Teams CQ and AA | |
|---|---|---|
| Managed using | SfB Admin Centre, PowerShell | Teams Admin Centre, PowerShell |
| Supports online telephone numbers | Yes | Yes |
| Supports on-premises telephone numbers | No | Yes* |
| License required | No | Yes (free) |
| Supports multiple telephone numbers | No | Yes |
| Supported Microsoft telephony platforms | Calling Plans | Calling Plans, Direct Routing, CCE, SfB Hybrid (2019) |
*Currently only supports Teams clients - 3PIP or SfB clients are not supported.
As you can see there are some fundamental differences between the two.
What is needed for a CQ or AA
There are two parts to make a CQ or AA work - the voice application (CQ/AA) itself and resource accounts that get assigned to them.
Resource Account(s)
These are not to be confused with Resource Mailboxes in Exchange.
Resource accounts are essentially entry points in to a voice application. How you create a resource account depends on the topology you have. If you are in an SfB hybrid (not CCE), you will need to create on-premises resource account called an “HybridApplicationEndpoint”. For online scenarios, the resource account is created in Office 365. I’ll quickly cover the steps needed to create, license and configure a resource account:
Create Resource Account
To create an online resource account, run the following (SfB Online PowerShell):
New-CsOnlineApplicationInstance -UserPrincipalName [email protected] -ApplicationId "ce933385-9390-45d1-9512-c8d228074e07" -DisplayName "Resource Account"
To create a on-premises resource account for SfB hybrid deployments (not CCE), run the following (SfB Server PowerShell):
New-CsHybridApplicationEndpoint -DisplayName "Resource Account" -SipAddress sip:[email protected] -ApplicationId "11cd3e2e-fccb-42ad-ad00-878b93575e07" -OU "ou=Users,dc=lee-ford,dc=co,dc=uk"
The -ApplicationId needs to be configured depending on if the resource account is for a CQ or AA:
Auto Attendant: ce933385-9390-45d1-9512-c8d228074e07
Call Queue: 11cd3e2e-fccb-42ad-ad00-878b93575e07
The resource account Display Name will be shown to the Teams client when receiving calls, so bear this in mind when naming it.
License Resource Account
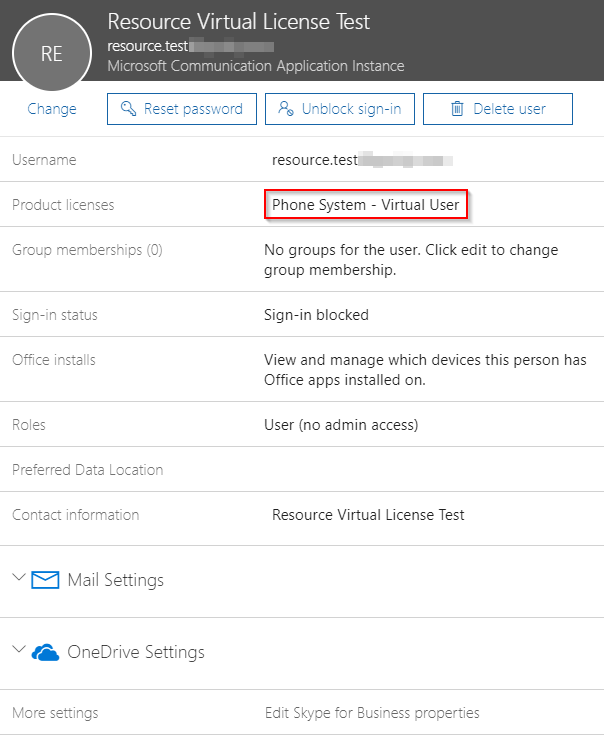
Once the account has been created and appears in the Office 365 Admin Portal (as a disabled user), it is ready to be licensed. Originally ‘E’ plan licenses + Phone System + Calling Plan was required for this. However, you can now use a free license “Phone System - Virtual User” instead.
Assign Telephone Number to Resource Account
In some cases, issues have been reported with assigning numbers just after licensing has been applied. It is recommended to leave at least 24 hours between license assignment and number assignment. However, I have also done one after the other without issue!
With the resource account assigned it’s license it is time to assign a number to the resource account. This will differ dependant on the topology you are using:
To assign an on-premises number (CCE or Direct Routing) to an online resource account (SfB Online PowerShell):
Set-CsOnlineApplicationInstance -Identity [email protected] -OnpremPhoneNumber +441234567890
To assign an online number (Calling Plan) to an online resource account (SfB Online PowerShell):
Set-CsOnlineVoiceApplicationInstance -Identity [email protected] -TelephoneNumber +441234567890
To assign an on-premises number (SfB Server Hybrid) to an on-premises resource account (SfB Online PowerShell):
Set-CsOnlineApplicationInstance -Identity [email protected] -OnpremPhoneNumber +441234567890
To assign an online number (Calling Plan) to an on-premises resource account (SfB Server PowerShell):
Set-CsHybridApplicationEndpoint -Identity [email protected] -LineURI tel:+441234567890
Voice Application
There are two types of voice application:
- Call Queue - A call queue is what you think it is. It allows calls to queue whilst alerting a group of users in various alerting patterns (attendant, serial, round robin)
- Auto Attendant - Complex routing of calls based on time or day or option selection e.g ‘Press 1 for sales…’
This is fairly straightforward process that I won’t outline here in detail. It is much easier to create these in the Teams Admin Centre than PowerShell. Below are the documentation for creating Call Queues and Auto Attendants:
https://docs.microsoft.com/en-us/microsoftteams/create-a-phone-system-call-queue https://docs.microsoft.com/en-us/microsoftteams/create-a-phone-system-auto-attendant
Assign a Resource Account to a Voice Application
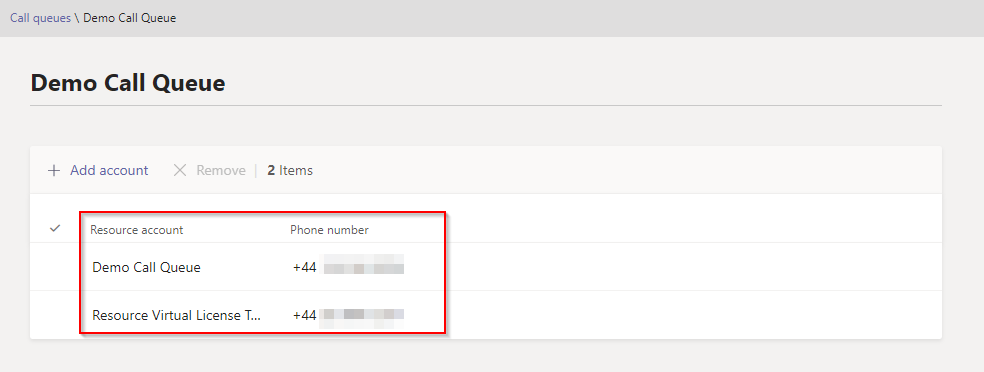
You can assign multiple resource accounts to a voice application. One benefit is multiple numbers terminating to a single voice application instead of having to manage multiple identical voice applications with different numbers.
If you created the voice application in the above steps you most likely already have assigned a resource account to the voice application. If not, this can be done afterwards:
Troubleshooting
If you are having trouble with the resource accounts, there are a few steps you can try.
Verify Account
After allowing for replication, run the following against the resource account to verify the telephone number is populated and the department is correct (SfB Online PowerShell):
Get-CSOnlineUser [email protected] | Select-Object DisplayName, LineURI, Department

You can also look at the resource accounts in the Teams Admin Centre to confirm the number is assigned:
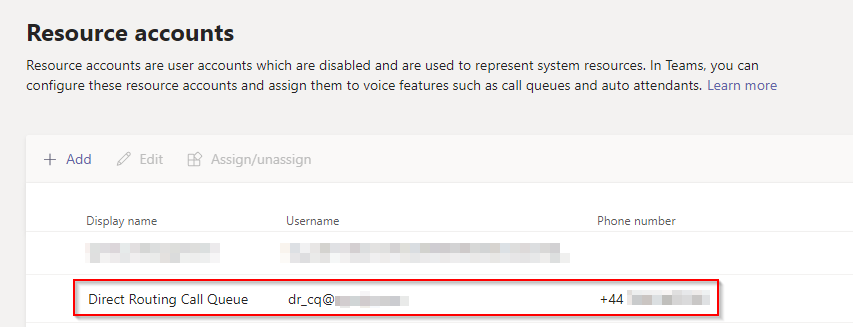
The LineURI should be assigned at the department should read “Microsoft Communication Application Instance” - if it is not, change it in Office 365/Azure AD Admin to this.
Give it time
If you are assigning licenses or telephone numbers to a resource account, it can take 24+ hours for this to provision - this is normal. If the account is not working (e.g. unable to call the assigned number) for an extended period, raise a case with MS as it may have been corrupted.
Don’t modify resource accounts once created
Once the resource account is created and working, try not to make any changes to it (licenses, telephone number assigned) as this is likely to break it in my experience. You are sometimes better off creating a new resource account (with a different UPN).
References
Here are some very useful articles on the matter:
https://docs.microsoft.com/en-us/microsoftteams/manage-resource-accounts
https://docs.microsoft.com/en-us/SkypeForBusiness/hybrid/configure-onprem-ra
https://ucstatus.com/2019/05/01/the-new-auto-attendants-call-queues/
https://ucstatus.com/2019/05/19/the-new-microsoft-teams-auto-attendants-call-queues-part-2/