Introduction
Skype Room System (SRS) v2 has been around a little while now, but until recently I’ve come in to contact with one.
SRS can be deployed in the following ways:
100% On-Premises - The Exchange and Skype for Business user will both be hosted premises installations. More info
100% Online - The Exchange and Skype for Business user will both be hosted in Office 365. More info
Hybrid - This can break down two ways:
In my scenario (number 1), I’m deploying in Office 365 entirely. I’m also using a Polycom MSR series to build my SRS, but these instructions can be used for others such as Logitech etc.
One distinction I’d like to make before we start, this is how to deploy an SRS in Office 365, not install it. As with any video-based solution - a wrong installation can adversely affect the adoption, I would recommend seeking advice from a professional installer, as you need to consider items such as:
- Room size - is this equipment too large/small for this room? e.g. If its too small, maybe the camera won’t capture the whole room?
- Room layout - will all participants of a room be able to participate comfortably in the current layout, or do we need to alter it to accommodate everyone? e.g. Will the table be too far back from the camera? Are the screens too high?
- Cabling considerations - there is a lot of cables involved with SRS, will these be easily hidden and safe? Will the cables between the dock and peripherals be long enough?
- Furniture - Does the furniture/fixings in the room need to be altered to accommodate SRS? e.g. A hole made in the table for cables
Whilst, not an exhaustive list, for an optimum meeting experience these are some of the questions you need to ask. Having a working SRS isn’t much use if the experience is poor.
Let’s get cracking.
Step 1 - Ensure you have all the equipment and licenses needed
Before we start, we want to make sure we’ve got everything in hand - licenses, hardware and anything else we might need.
Office 365 Licenses:
This link gives you a good overview of what Office 365 licenses are required for each scenario. But it boils down to the following:
- Skype Online Plan 2 or higher* (can be standalone or part of E1, E3, Business Premium etc.) - This will allow the device to sign in to Skype for Business and participate in meetings
- Audio Conferencing - Dial out from a current meeting to external phone numbers. (Does not allow ad-hoc phone calls)
- Phone System with Calling Plan - Assign the room system a telephone number and be able to make and receive ad-hoc phone calls outside of a meeting. (If using Hybrid Voice e.g. CCE, Calling Plans are not required)
- There is mention of a Skype Online Plan 3 in some documentation, but can’t see that in Office 365 licenses on my tenant.
Worth noting we are creating an Exchange resource mailbox, which doesn’t need an Exchange license.
Windows Licenses:
- Windows 10 Enterprise - You will need to license the Surface Pro that runs SRS it just like any other Windows machine. As its Enterprise, this is normally done via KMS. There is mention of Windows 10 Enterprise ‘IoT’ build in some documentation, but from what I can see, this is really for distributors wanting to bundle it up as a package and sell it as a complete off-the-shelf package.
Hardware:
Surface Pro 4 or Surface Pro (2017) - the supported hardware configurations are found here
Supported camera, dock and conference phone (audio peripheral). In my scenario, I’m using a Polycom MSR300 which consists of:
- Polycom EagleEye (IV) MSR camera
- Polycom MSR dock
- Polycom Trio 8800 conference phone
32GB+ USB stick formatted as FAT32 to put installation image on. Make sure any data you want to keep is removed first.
Windows 10 machine to prepare the image, you will also need Azure AD and Skype Online PowerShell installed.
Keyboard and mouse for Surface just in case (I had a Type Cover)
Step 2 - Download required software
Now let’s get all the software required.
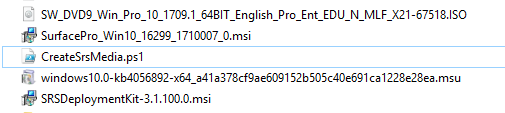
- Skype Room System v2 installation package
- Windows 10 Enterprise build 1709 64bit (now supported) ISO - I downloaded this from VLSC, looks to be a bundled build
- Supported drivers for Surface Pro 4 or Surface Pro (2017) - if prompted download the “16299” build
- MSU for KB4056892
- CreateSrsMedia.ps1 PowerShell script
Whilst they’re downloading, let’s get the user setup.
Step 3 - Setup the user in Office 365
First, let’s connect to Exchange Online:
Set-ExecutionPolicy Unrestricted
$cred = Get-Credential
$session = New-PSSession -ConfigurationName Microsoft.Exchange -ConnectionUri https://outlook.office365.com/powershell-liveid/ -Credential $cred -Authentication Basic -AllowRedirection
Import-PSSession $session
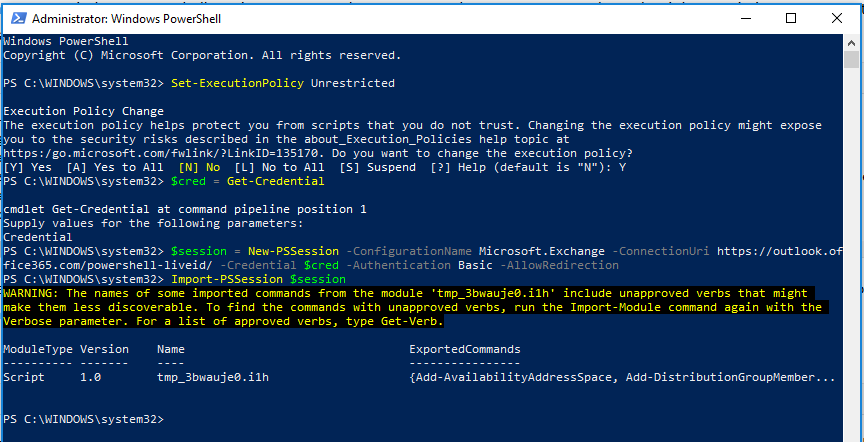
Once connected, let’s create a new resource mailbox and enable the room mailbox account for it, specify a password and make a note of the password you use as you will need it later to sign in on the device:
New-Mailbox -MicrosoftOnlineServicesID [email protected] -Alias skyperoomsystem -Name "Skype Room System" -Room -EnableRoomMailboxAccount $true -RoomMailboxPassword (ConvertTo-SecureString -String <password> -AsPlainText -Force)

We now need to change some properties around the meetings and the calendar works (auto accept meetings, don’t allow conflicts, auto-reply etc.) :
Set-CalendarProcessing -Identity [email protected] -AutomateProcessing AutoAccept -AddOrganizerToSubject $false -AllowConflicts $false -DeleteComments $false -DeleteSubject $false -RemovePrivateProperty $false
Set-CalendarProcessing -Identity [email protected] -AddAdditionalResponse $true -AdditionalResponse "Skype Meeting Room"

That’s Exchange all done. Using the same $cred from before, now connect to Azure AD:
Connect-MsolService -Credential $cred

Whilst password expiry is a good thing, I personally would set the password on the account to not expire, so you don’t have to change the password on the device regularly.
Set-MsolUser -UserPrincipalName [email protected] -PasswordNeverExpires $true

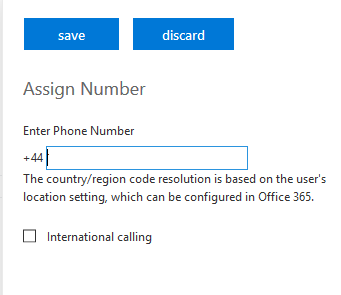
Now, let’s set the phone number for the room against the user - if you want one. (This is just assigning the number to the contact information of the AD user, we actually need to assign the number to the Skype LineURI separately):
Set-MsolUser -UniversalPrincipalName [email protected] -PhoneNumber <phone number>

With Azure AD done, let’s sign in to Office 365 and assign the licenses to the user:
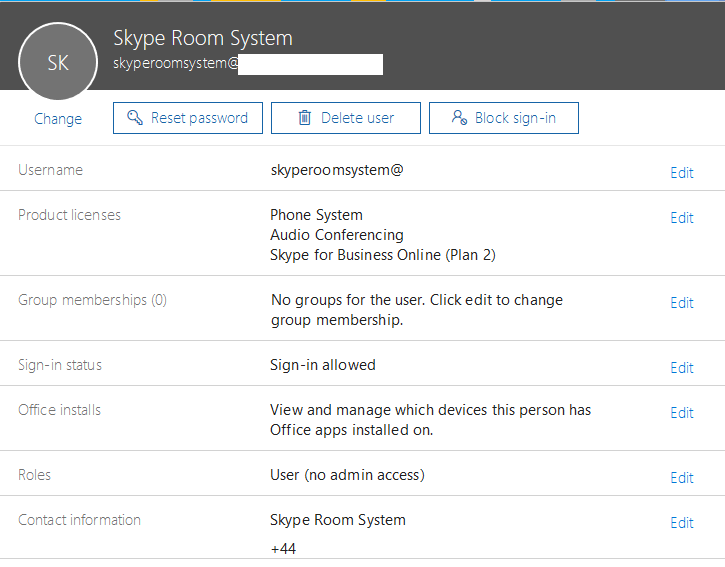
(In my case that was Skype Online Plan 2, Phone System and Audio Conferencing. There is no calling plan as I was looking to utilize a SIP trunk and CCE).
Back to PowerShell, let’s sign in to Skype Online:
$session = New-CsOnlineSession -Credential $cred
Import-PSSession $session -AllowClobber

Once connected, we need to find out the user’s registrar pool. With that, then enable the user account as a meeting room on that pool.
$pool = Get-CsOnlineUser -Identity [email protected] | Select -Expand RegistrarPool
Enable-CsMeetingRoom -Identity [email protected] -RegistrarPool $pool -SipAddressType EmailAddress

Lastly, go to Skype for Business admin centre on Office 365 and assign the telephone number under Voice Users:
Now the all the account setup is complete and ready to be used.
Step 4 - Prepare installation image for Surface Pro
Plug a 32GB+ USB stick into your Windows 10 machine. If not already, format it to use FAT32. Note down the drive letter assigned.
Mount the Windows 10 Enterprise ISO and note down the drive letter assigned to that too.
Create a folder and place all the files we downloaded in it.
From an elevated PowerShell prompt, run CreateSrsMedia.ps1, when prompted:
- Enterprise for the type of customer
- In my scenario, I only need English, so I ignore installing language packs
- Select the target USB stick - make sure you select the correct USB drive letter if you have multiple
- Specify the drive path where the ISO is mounted e.g. F:\
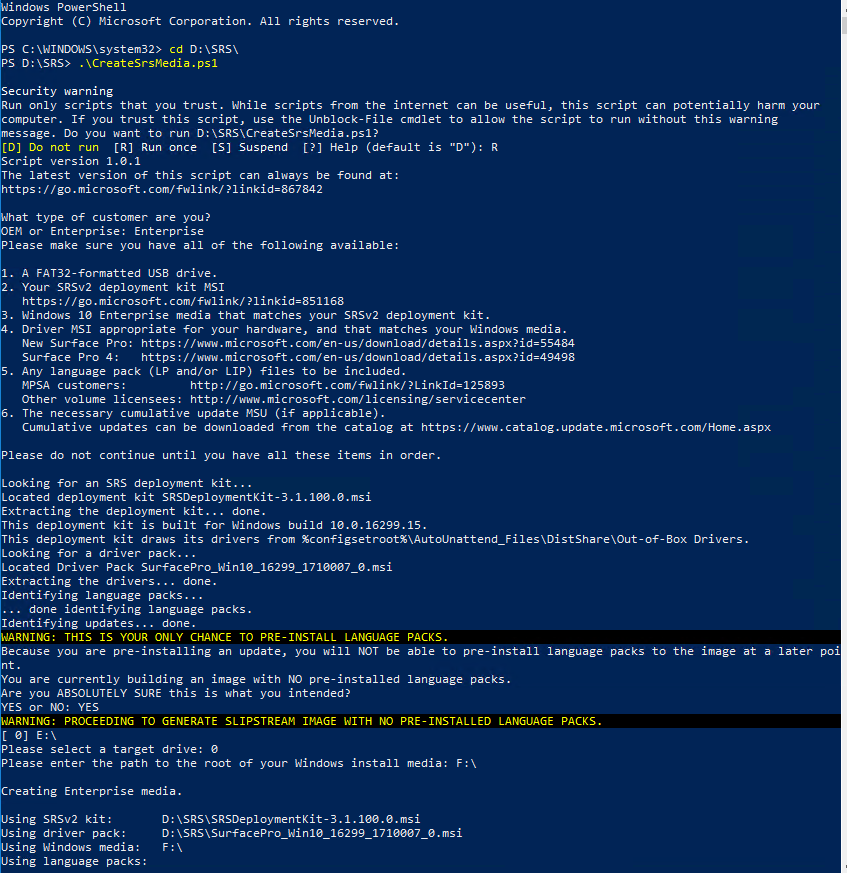
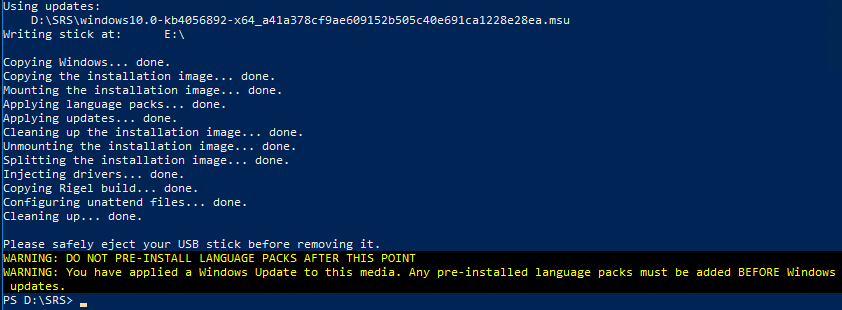
Go make a brew as this will take some time! (Took around an hour for me).
Step 5 - Install the image on the Surface Pro
Now we have the prepared USB stick, we can install it on the Surface Pro. These are the instructions Mircosoft advise to boot a Surface Pro via USB and install:
- The tablet should be connected to a power source. Start from a completely powered-off state. If necessary, press and keep pressing the Power button until the tablet switches off.
- Plug your USB Setup disk into the tablet.
- Press and continue to hold the volume down (-) button on the tablet.
- Press and release the power button on the tablet.
- Once Windows setup is booted, release the volume down (-) button.
- The system will shut down once installation is complete.
All being well the tablet should boot via USB, install the software and reboot a couple of times and shutdown when finished.
Now the software is on the Surface Pro, we need to physically put it all together before turning it back on.
Step 6 - Connect peripherals to the Surface Pro
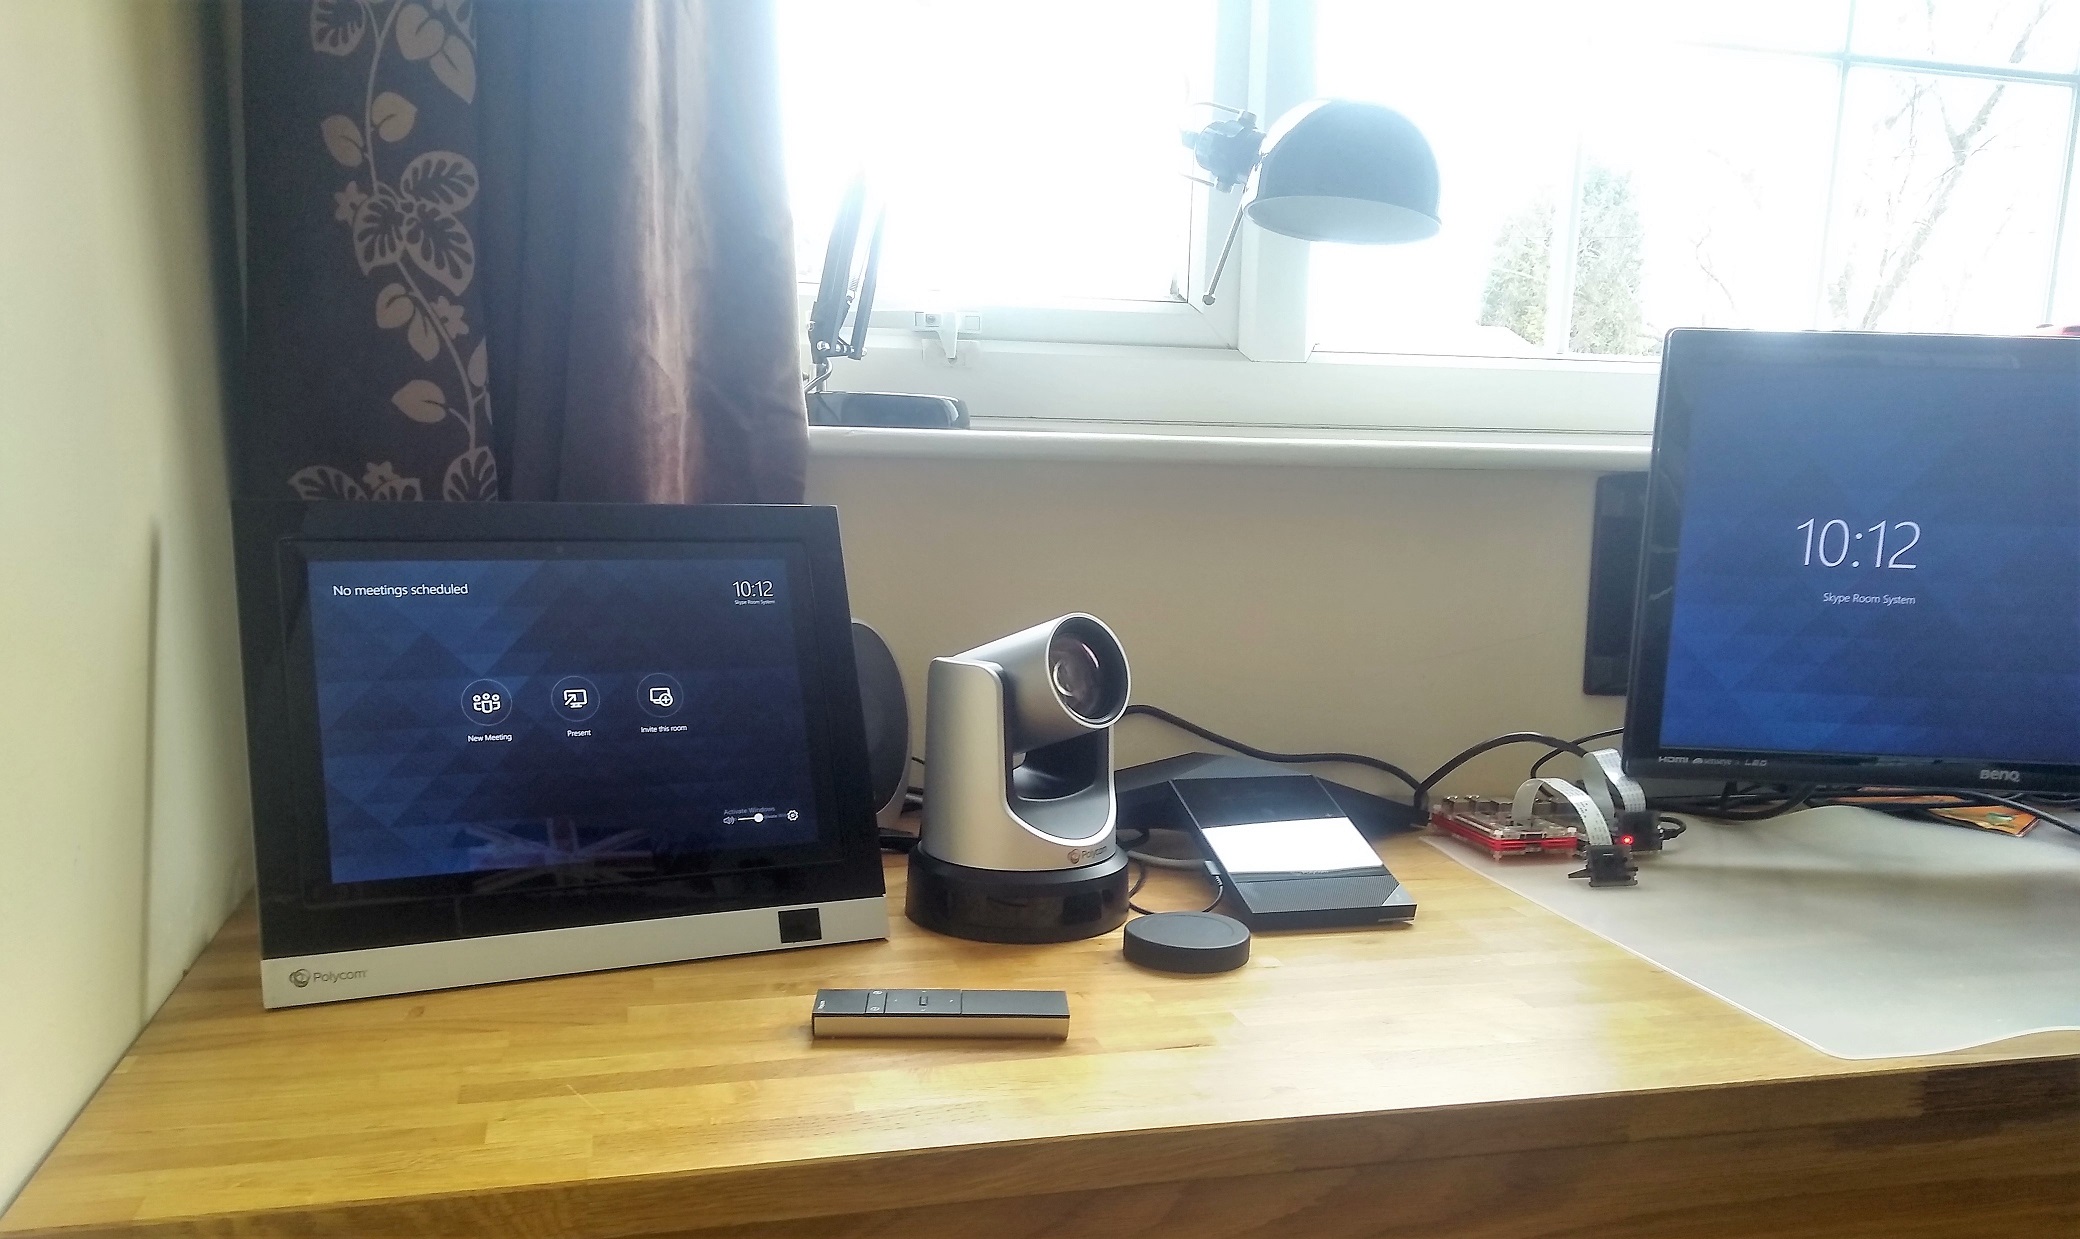
In my scenario I’m putting the Surface Pro in an MSR dock, connecting up a Trio 8800 conference phone and Eagle Eye camera - it is pretty obvious where each cable needs to go. I attached one HDMI to my screen (you can have up to two screens) and another into the input to allow presentations. It should go without saying you will need network and power connectivity too.
Note: Your peripherals may need to be on a particular firmware or have a setting enabled to work. In my case, the Trio 8800 I updated to the latest firmware and then changed the “Base Profile” to “Skype USB Optimized”. As for the Eagle Eye camera, I upgraded as per Polycom’s MSR Guide
I’m not 100% sure it’s required but I signed my Trio 8800 into Skype for Business using the same account we set up for SRS. By doing this, it allows us to use the Trio should the SRS be unavailable/not required or if a use mistakenly tries to dial out from the Trio instead of the SRS. In theory, I could have a separate account for the Trio 8800 and the SRS and it would still work.
Step 7 - Configure Surface Pro
We can now switch on the Surface Pro. Cortana will nicely ask you to set a language/region and keyboard layout.
You’ll then have to run via the Skype setup wizard:
- First, accept the terms.
- Next, enter the account information. The Skype sign-in address and exchange should be the same. The domain should be left blank if signing in via Office365.
- Under features, I’ve left Auto-screen sharing on and specified my conference phone (Trio 8800) for speaker and microphone.
- Finally, I left the theme as default.
And there you are, you should have a fully functioning Skype Room System (don’t worry, this isn’t the SRS’s permanent home):
(For the eagle-eyed, this was before I activated the Windows 10 license by joining it to the domain!)
Step 8 - Post install notes
I’ve noted some observations after install:
To gain access to the settings you will be prompted for a password for the Admin account - this is “sfb”
Once in the settings, you access the full desktop (referred to as “Admin” in the documentation) under “Windows Settings” and “Go to Admin Sign-in”. Then, select the Admin account - again, the password is “sfb”.
As Admin is the full desktop experience, I would recommend doing the following:
- Changing the Administrator account password to something other than “sfb”. You don’t want some joker using the default password and causing havoc.
- If the timezone is wrong (as it was in my case), change the timezone - seems crazy this isn’t under the standard SRS settings to me.
- Change the computer name to something more useful than a randomly generated name.
- Activate Windows (if not already).
- Make sure Windows Update is set to run (it should be), and run when you want it to (not in the middle of meetings).
- Enable remote desktop to allow for easier remote management.
It might be worthwhile joining it to the domain, but be careful any GPOs don’t overwrite whats set e.g. never go to sleep or automatic login. Settings to watch out for can be found here.
Talking of Group Policy, it might also be wise to setup QoS on the device, much like any other Windows SfB client.
You can monitor via Azure OMS and Power BI, see my blog post on this.
Hope this helps.