Last Updated: 13th August 2020
Introduction
Microsoft has released Direct Routing for Microsoft Teams. Direct Routing effectively allows you to connect up existing PSTN connectivity (e.g. SIP trunks) into a certified SBC and route directly to Teams. This differs from the Skype Online method of doing this, in that you no longer need any hardware (on-premises Skype for Business Server or a CCE) other than an SBC.
In this post, I’ll go over how to do this with an AudioCodes SBC and SIP trunks. I shan’t go into any more detail than is required, as the documentation from Microsoft and AudioCodes is pretty good (see references at bottom of post).
Pre-requisites
Before you begin configuration, you need to make sure you have everything needed in place:
AudioCodes SBC:
Running software version at least 7.20A.250.xxx or above - the latest Microsoft recommended software version can be found here
If you can, go with the latest supported software version, for this post, I am using 7.20.256.396
The following licenses installed on the SBC:
- Microsoft Teams (Part SW/MSTEAMS) - this enables the SBC for Teams Direct Routing and enables the audio codecs SILK and OPUS. Before release 7.20A.250.xxx you didn’t need this license for Direct Routing to work. If your SBC is 7.20A.250 or above you will need this!
- SBC sessions - same as any other AudioCodes SBC configuration using SIP-SIP, it will consume SBC sessions - each call consumes 1 SBC session
- (Optional) Transcoding - if your SIP carrier doesn’t support a codec you want to use e.g G.711 for Teams Direct Routing e.g. SILK - you would require transcoding to convert between the two codecs
The SBC has a “WAN” interface with a public IP address assigned (or NAT’d through) to the “WAN” interface. It is common to also have a “LAN” interface for management but it’s not a requirement
A SIP trunk or PSTN trunk configured on the SBC - I can’t cover how to configure this in detail as it could be configured in a million different ways
Network:
DNS A record created that points to the public IP address of the SBC. This can be part of any domain that is in the Office 365 tenant (except the onmicrosoft.com domain). An example could be sbc.domain.com if domain.com is a verified domain on your tenant
A publicly issued certificate with the FQDN of the SBC in the common name or SAN. You can also use a wildcard, but I’ve not tried that here. Microsoft does not trust all public CAs, so make sure it is on their list (most common CAs are). Examples of trusted CAs are DigiCert, GlobalSign, Go Daddy
Communication is allowed through any firewalls between the SBC and the internet. The following ports need to be allowed:
Traffic From To Source Port Destination Port Description SIP/TLS Teams SIP Proxy* SBC 1024-65535 TCP Defined on SBC SIP signalling from Teams to your SBC, the destination port is dependant on what you configure the TLS SIP Interface to be (e.g. 5067 TCP) SIP/TLS SBC Teams SIP Proxy* Defined on SBC 5061 TCP SIP signalling from your SBC to Teams. I would recommend you allow all source ports (1024-65535 TCP) from SBC to destination port 5061 TCP UDP/SRTP Teams Media Processor** SBC 3478-3481,49152-53247 UDP Defined on SBC Media from Teams to your SBC. The destination port is dependant on what is configured in the media realm on the SBC UDP/SRTP SBC Teams Media Processor** Defined on SBC 3478-3481,49152-53247 UDP Media from your SBC to Teams. The source port is dependant on what is configured in the media realm on the SBC *Teams SIP Proxy IPs are currently defined as:
- 52.114.148.0 (yes, .0)
- 52.114.132.46
- 52.114.75.24
- 52.114.76.76
- 52.114.7.24
- 52.114.14.70
- NEW (2020): 52.114.16.74
- NEW (2020): 52.114.20.29
**Teams Media Processor IPs are currently defined as:
- 52.112.0.0/14
- NEW (2020): 52.120.0.0/14
For latest IP addresses in use, check here
Office 365:
- Access to the tenant via Skype Online PowerShell
- Users who will use Direct Routing are:
- Homed online (not on-premises)
- Teams coexistence mode is Teams Only (globally or user-assigned)
- Licensed correctly with the following licenses:
- Microsoft Teams - Part of E3, E5 etc.
- Phone System - Can be bought standalone or part of E5
- Audio Conferencing - Not technically required to make and receive calls, but needed if adding participants to meetings etc. Can be bought standalone or part of E5
Configure SBC
At this stage you should have an SBC:
- Running version 7.20A.250.xxx or above and licensed for Teams and with SBC sessions
- Configured the PSTN on the SBC e.g. SIP trunk
- A “WAN” side interface with a public IP address (assigned or NAT’d)
- Created an DNS A record for the SBC and it should be pointing at the SBC’s public IP address
With that all complete, you can proceed to configuration of the SBC.
Certificates
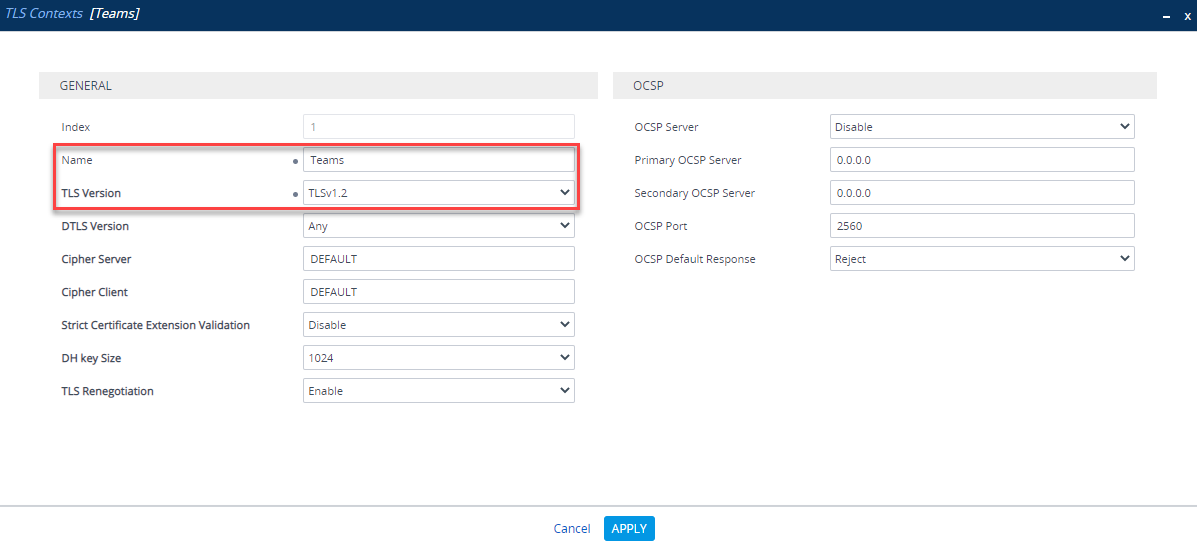
The first thing to do is setup a certificate so Teams and the SBC trust each other and encrypt all traffic between them. Under Setup > IP Network >Security >TLS Contexts, create a new TLS Context specifically for Teams:
| Parameter | Value |
|---|---|
| Name | Teams (arbitrary name) |
| TLS Version | TLS v1.2 |
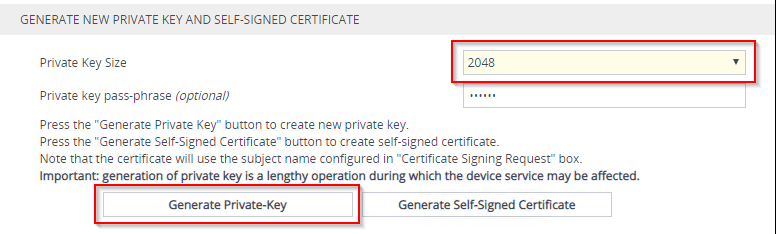
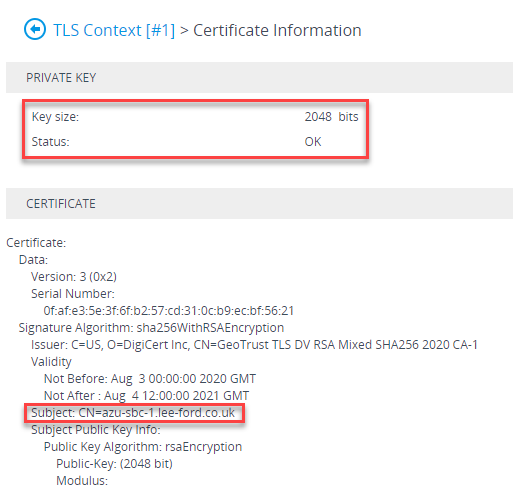
Next, under the new TLS Context, go to Change Certificate and change the private key size to 2048 and generate a new private key
Once the new private key has been generated, complete the CSR. As mentioned earlier, the SBC FQDN needs to be in the common name and/or SAN.
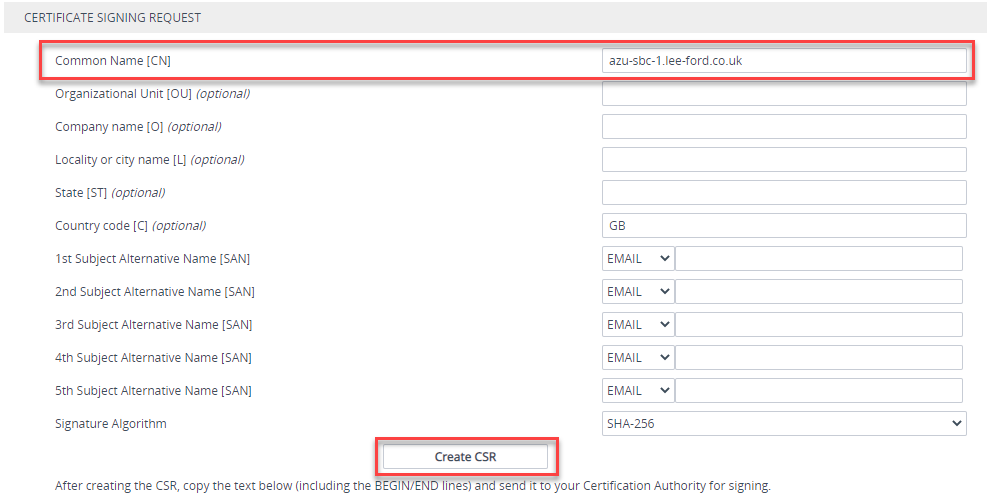
Create the CSR (make sure to generate a 2048 bit private key first). It should generate a CSR underneath. Copy this and raise with your public Certificate Authority (making sure its supported as per the list).
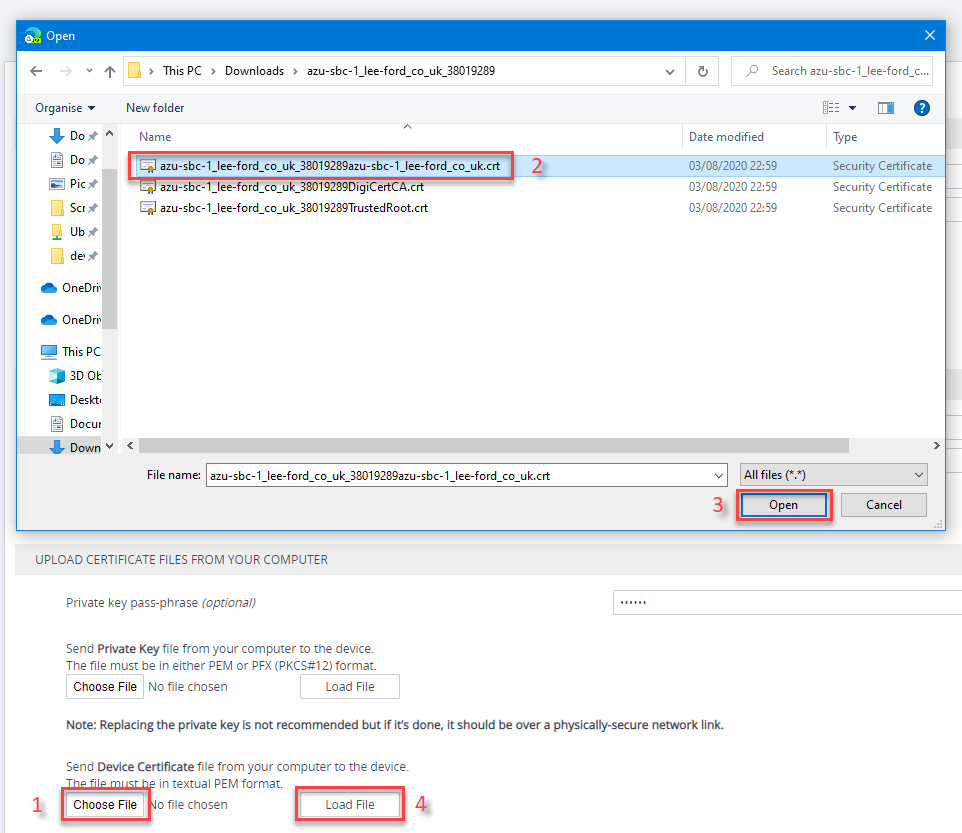
Once the certificate is issued, upload it as a device certificate in the same location you generated the CSR:
If you now go back the TLS context, under Certificate Information, you should have the issued certificate:
Now the certificate is installed, you will need to install any root or intermediates that are in the chain of the issued certificate. In addition, you will also need to install the root certificate used by Teams SIP Proxy is using - this can be downloaded here. Still under the TLS context, go to Trusted Root Certificates and import the root and intermediate certificates.
Note: the SBC will only import certificates in Base64 format, not DER

In my case I have a Digicert root and an GeoTrust intermediate for my certificate and a Baltimore root so that the Teams SIP Proxy is trusted
Media Realms
A Media Realm is a definition of UDP ports to use for media on an SBC interface. Navigate to Setup > Signaling and Media > Core Entities > Media Realms. If there isn’t a Media Realm assigned to your “WAN” interface, create one. Microsoft recommend two ports per session/call, so base the Media Session Legs on how many SBC sessions you are likely to have and double it and you will have plenty of headroom. Make a note of the “WAN” interface port range as this is the defined SBC media range for the firewall rules mentioned earlier.
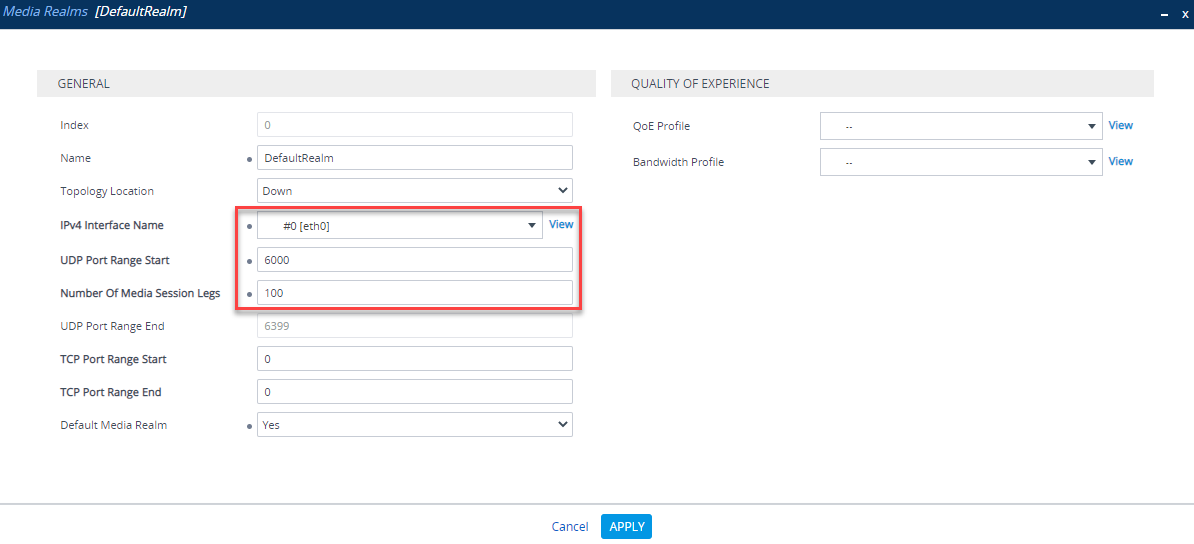
In this example, I have started on port 6000 with 100 Media Session Legs, so my defined SBC media port range will be 6000-6399 UDP
SIP Interface
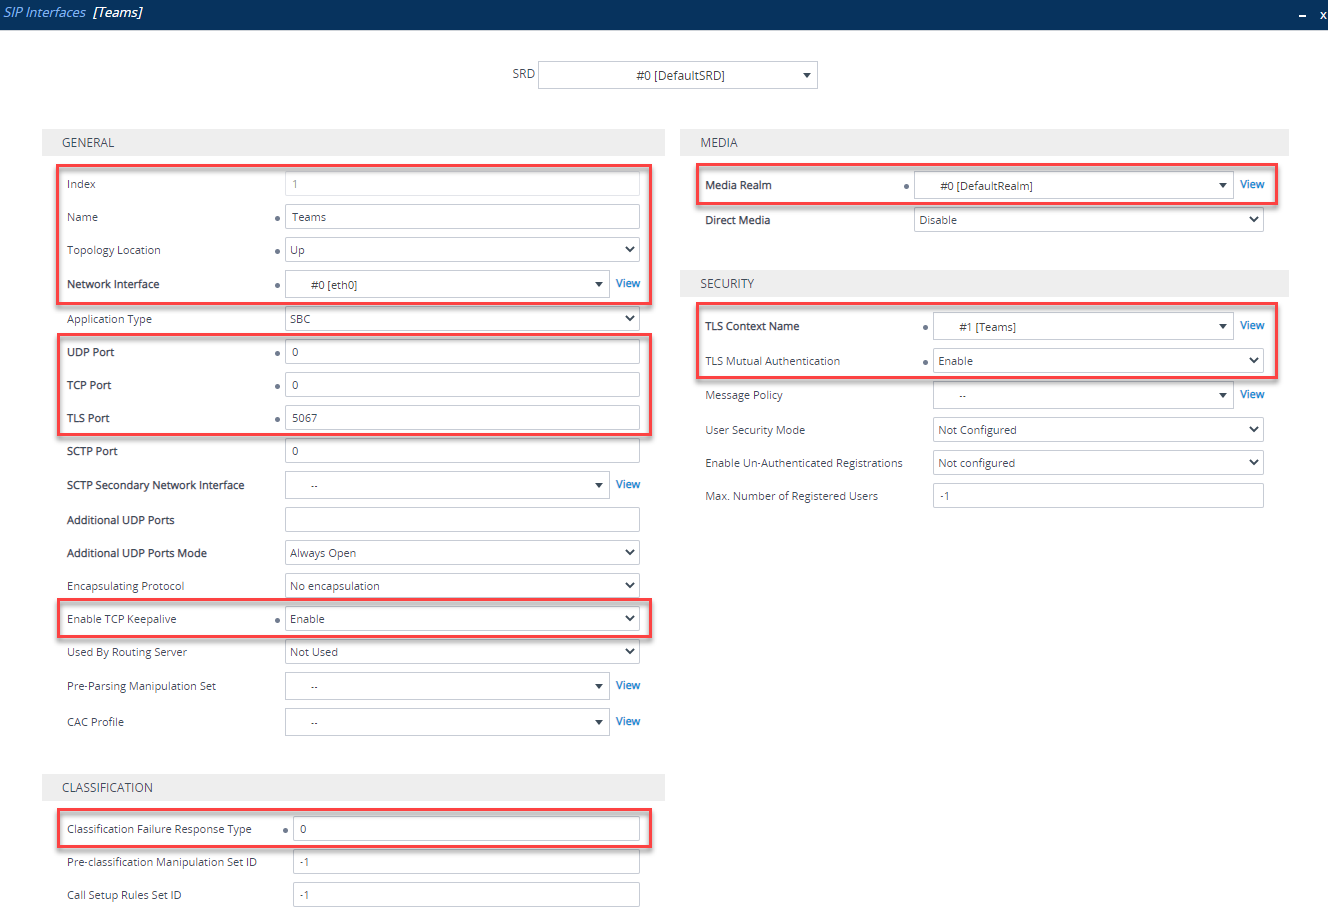
A SIP interface is similar to a Media Realm, it defines what ports and protocols are used for each SBC interface. Navigate to Setup > Signaling and Media > Core Entities > SIP Interfaces. Click New and create a new SIP Interface. You will need to configure the following:
| Parameter | Value |
|---|---|
| Index | Use an Index other than 0 |
| Name | Teams (arbitrary name) |
| Network Interface | “WAN facing” interface |
| UDP Port | 0 |
| TCP Port | 0 |
| TLS Port | Port used to listen for TLS signaling e.g. 5067 |
| Enable TCP Keepalive | Enable |
| Classification Failure Response | 0 (SBC will not respond to failures, useful in DDoS attacks) |
| Media Realm | Media realm attached to “WAN facing” interface (created previously) |
| TLS Context Name | “Teams” TLS context (created previously) |
Proxy Set
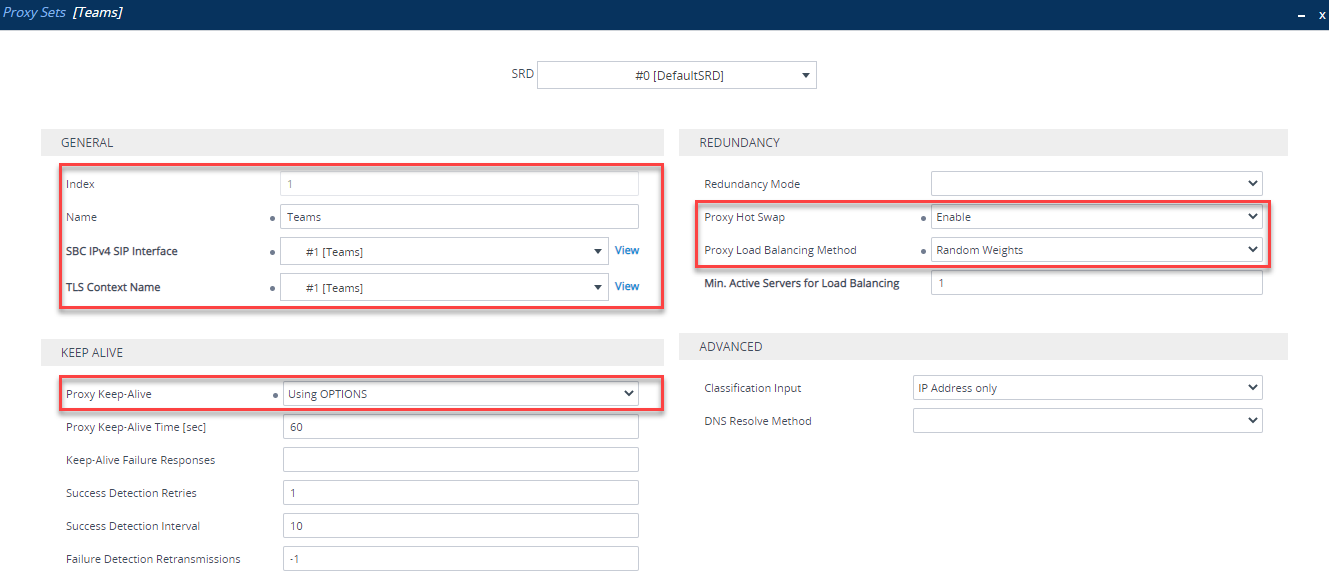
A Proxy Set is a definition of IP addresses or hostnames the SBC will use to communicate with, in this case, Teams. Navigate to Setup > Signaling and Media > Core Entities > Proxy Sets. Add one for Teams by clicking New. Set up as follows:
| Parameter | Value |
|---|---|
| Index | Use an Index other than 0 |
| Name | Teams (arbitrary name) |
| SBC IPv4 SIP Interface | Teams SIP Interface (created previously) |
| Proxy Keepalive | Using OPTIONS |
| Proxy Hot Swap | Enable |
| Proxy Load Balancing Method | Random Weights |
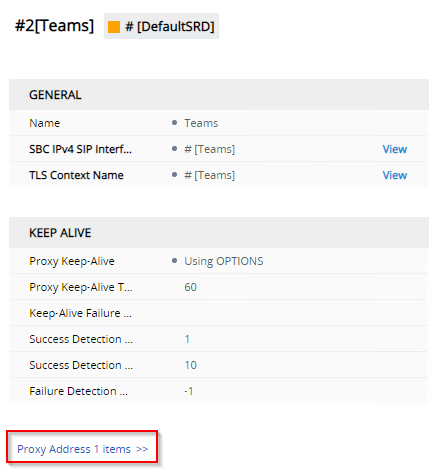
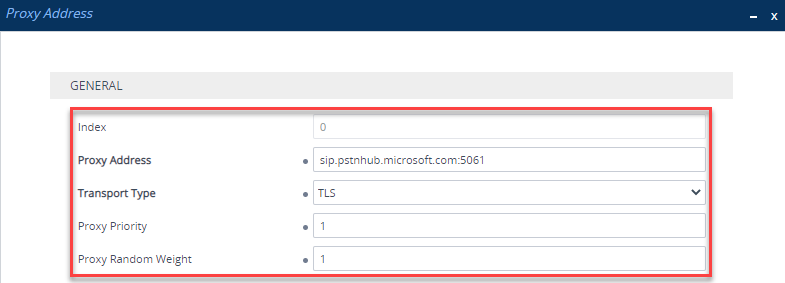
Once the Proxy Set is created, you need to click Proxy Addresses at the bottom of the Proxy Set:
Add the following Proxy Addresses:
| Index | Proxy Address | Transport Type | Proxy Priority | Proxy Random Weight |
|---|---|---|---|---|
| 0 | sip.pstnhub.microsoft.com:5061 | TLS | 1 | 1 |
| 1 | sip2.pstnhub.microsoft.com:5061 | TLS | 2 | 1 |
| 2 | sip3.pstnhub.microsoft.com:5061 | TLS | 3 | 1 |
The three addresses here are the primary and two standby Teams SIP Proxy addresses. It’s quite clever in that depending on where the SBC is located, each address will resolve to the nearest entry point in order. In EMEA for example, sip.pstnhub.microsoft.com would be the EMEA entry point, sip2.pstnhub.microsoft.com would be the NA entry point and sip3.pstnhub.microsoft.com would be the APAC entry point:
| Proxy Address | EMEA | NA | APAC |
|---|---|---|---|
| sip.pstnhub.microsoft.com | EMEA | NA | APAC |
| sip2.pstnhub.microsoft.com | NA | EMEA | NA |
| sip3.pstnhub.microsoft.com | APAC | APAC | EMEA |
Once all proxy addresses have been added, it should look like this:

If you set this up in the past, you may have used ’teams.local’ - this can be replaced with the above and the Proxy Set parameter “DNS Resolve Method” cleared
Coder Group
A Coder Group is a list of codecs to use for each SIP trunk. Navigate to Setup > Signaling and Media > Coders and Profiles > Coder Groups. Here, you need to an define an unused group what codecs will be used when communicating with Teams:
| Coder Name | Packetization Time | Rate | Payload Type | Silence Suppression |
|---|---|---|---|---|
| SILK-NB | 20 | 8 | 103 | N/A |
| SILK-WB | 20 | 16 | 103 | N/A |
| G.711A-law | 20 | 64 | 8 | Disabled |
| G.711U-law | 20 | 64 | 0 | Disabled |
| G.729 | 20 | 8 | 18 | Disabled |
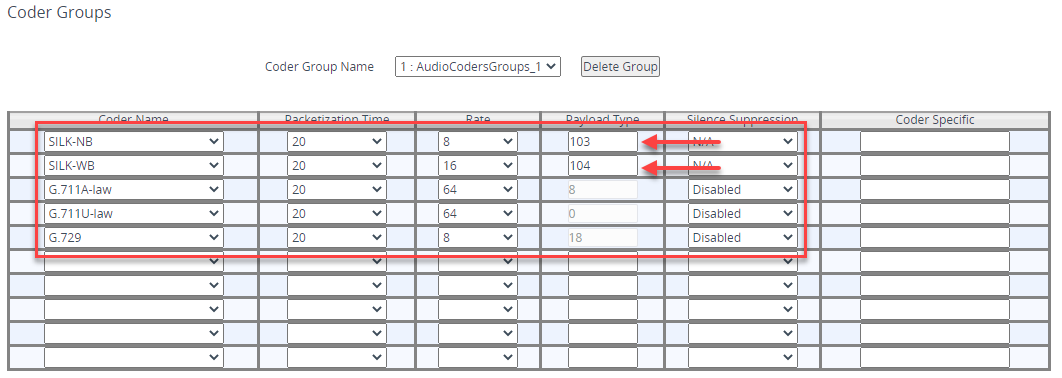
I have chosen spare Coder Group 1 - pay close attention to the SILK Payload Types as these are NOT default values. Also for SILK, you will need to be licensed to use this codec - it should be licensed as part of the Teams SBC SKU
Don’t forget to Apply at the bottom once finished!
IP Profile
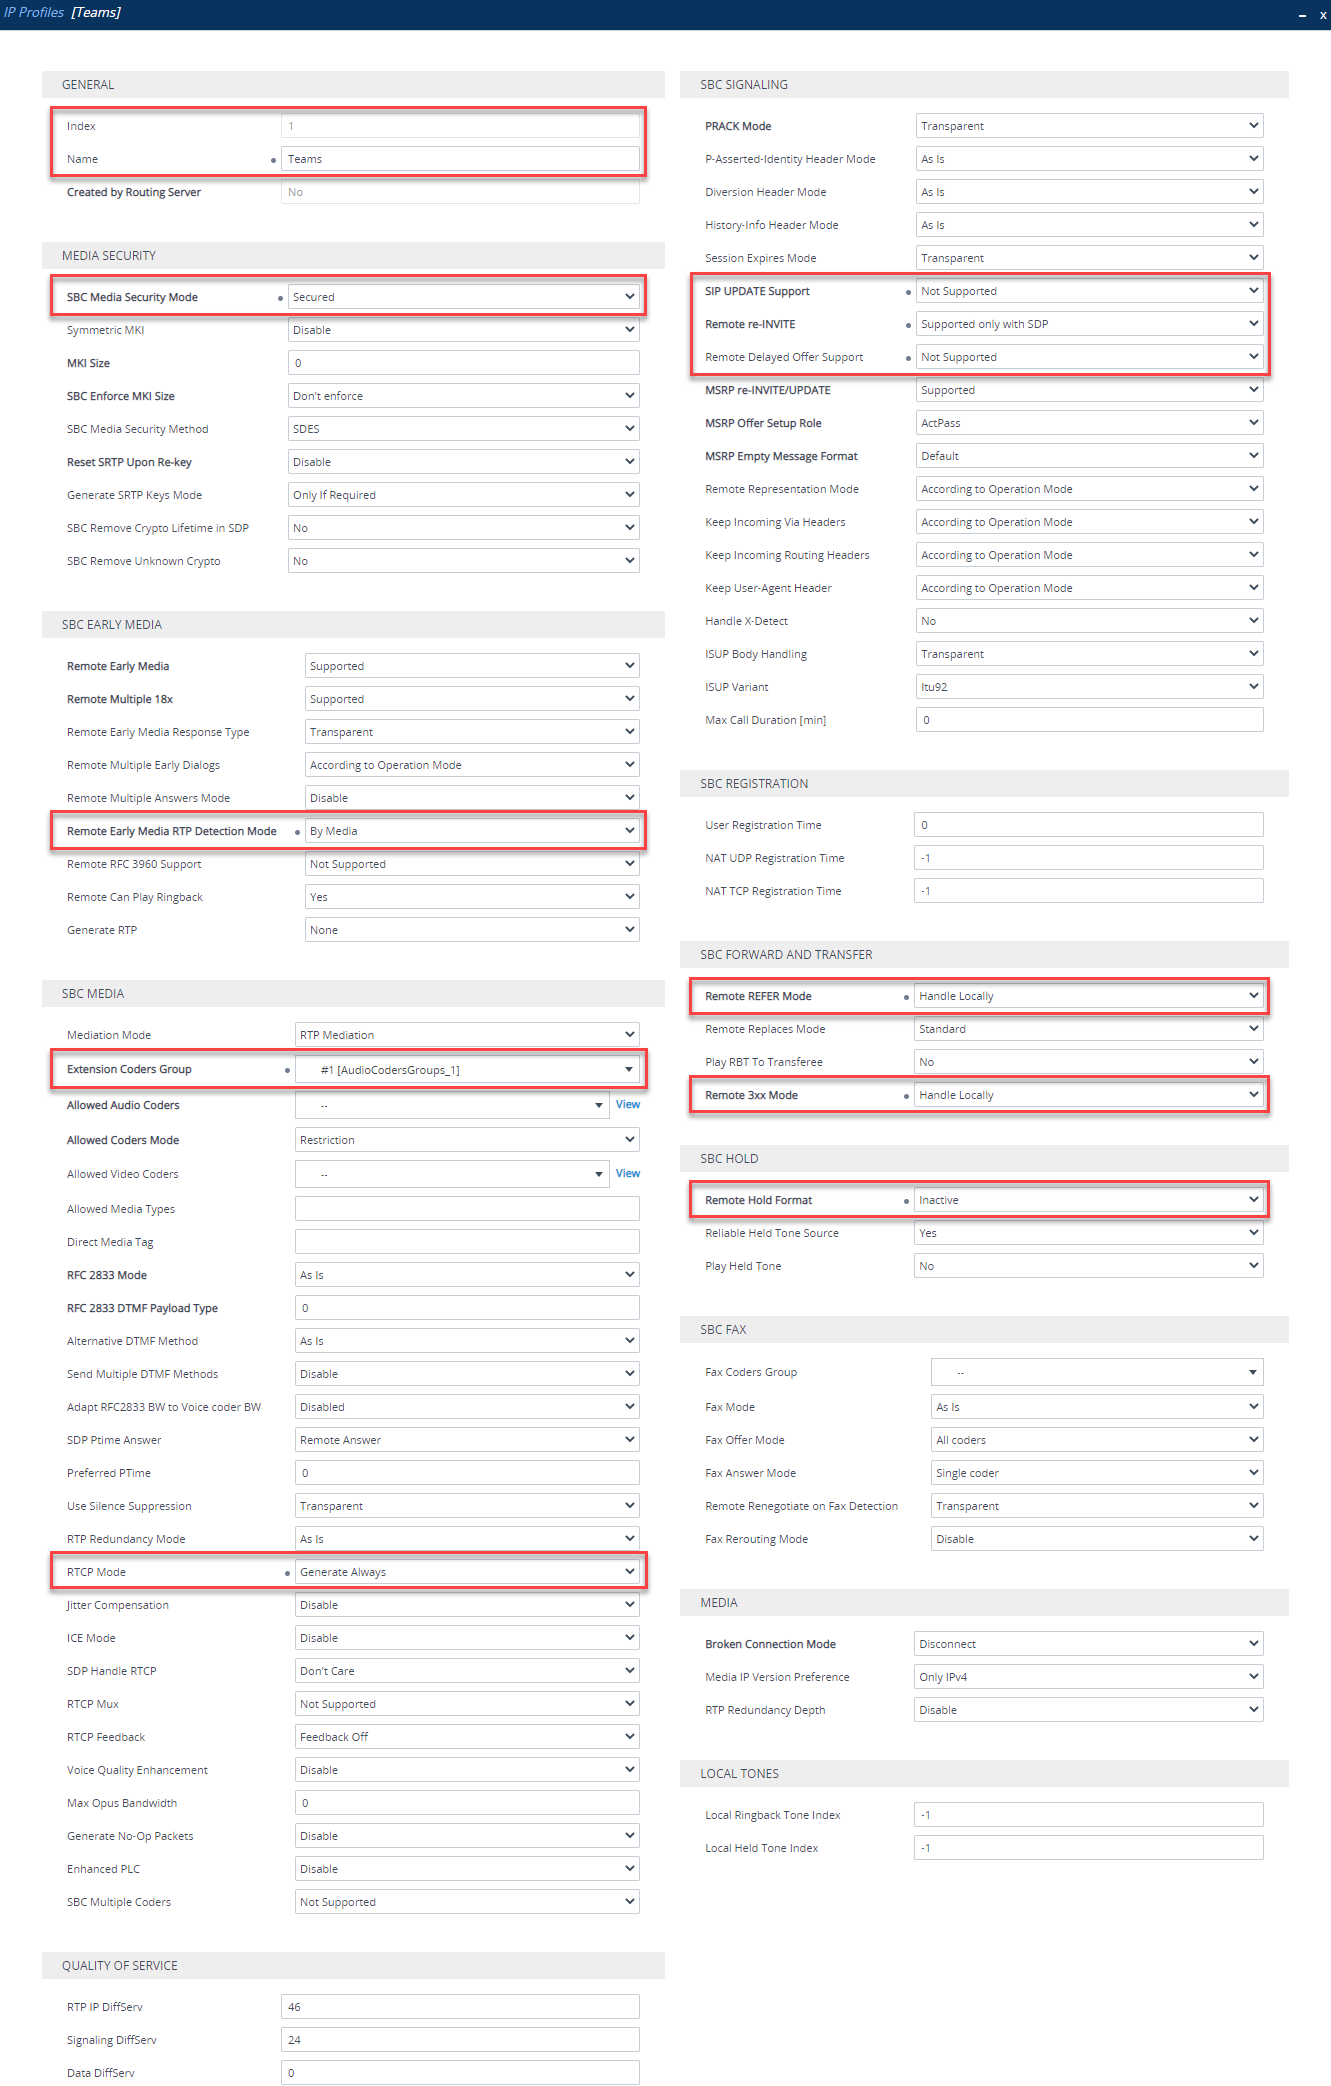
An IP Profile defines the SIP behavior of an IP Group based on what is set in the IP Profile. Navigate to Setup > Signaling and Media > Coders and Profiles > IP Profiles. Click New and add one like so:
| Section | Parameter | Value |
|---|---|---|
| General | Index | Use an Index other than 0 |
| General | Name | Teams (arbitrary name) |
| Media Security | SBC Media Security Mode | Secured |
| SBC Early Media | Remote Early Media RTP Detection Mode | By Media |
| SBC Media | Extension Coders Group | Coders Group (created previously) |
| SBC Media | RTCP Mode | Generate Always |
| SBC Media | ICE Mode | Lite (Only required if using Media Bypass) |
| SBC Signalling | SIP UPDATE Support | Not Supported |
| SBC Signalling | Remote re-INVITE Support | Supported Only with SDP |
| SBC Signalling | Remote Delayed Offer Support | Not Supported |
| SBC Forward and Transfer | Remote REFER Support | Handle Locally |
| SBC Forward and Transfer | Remote 3xx Mode | Handle Locally |
| SBC Hold | Remote Hold Format | Inactive |
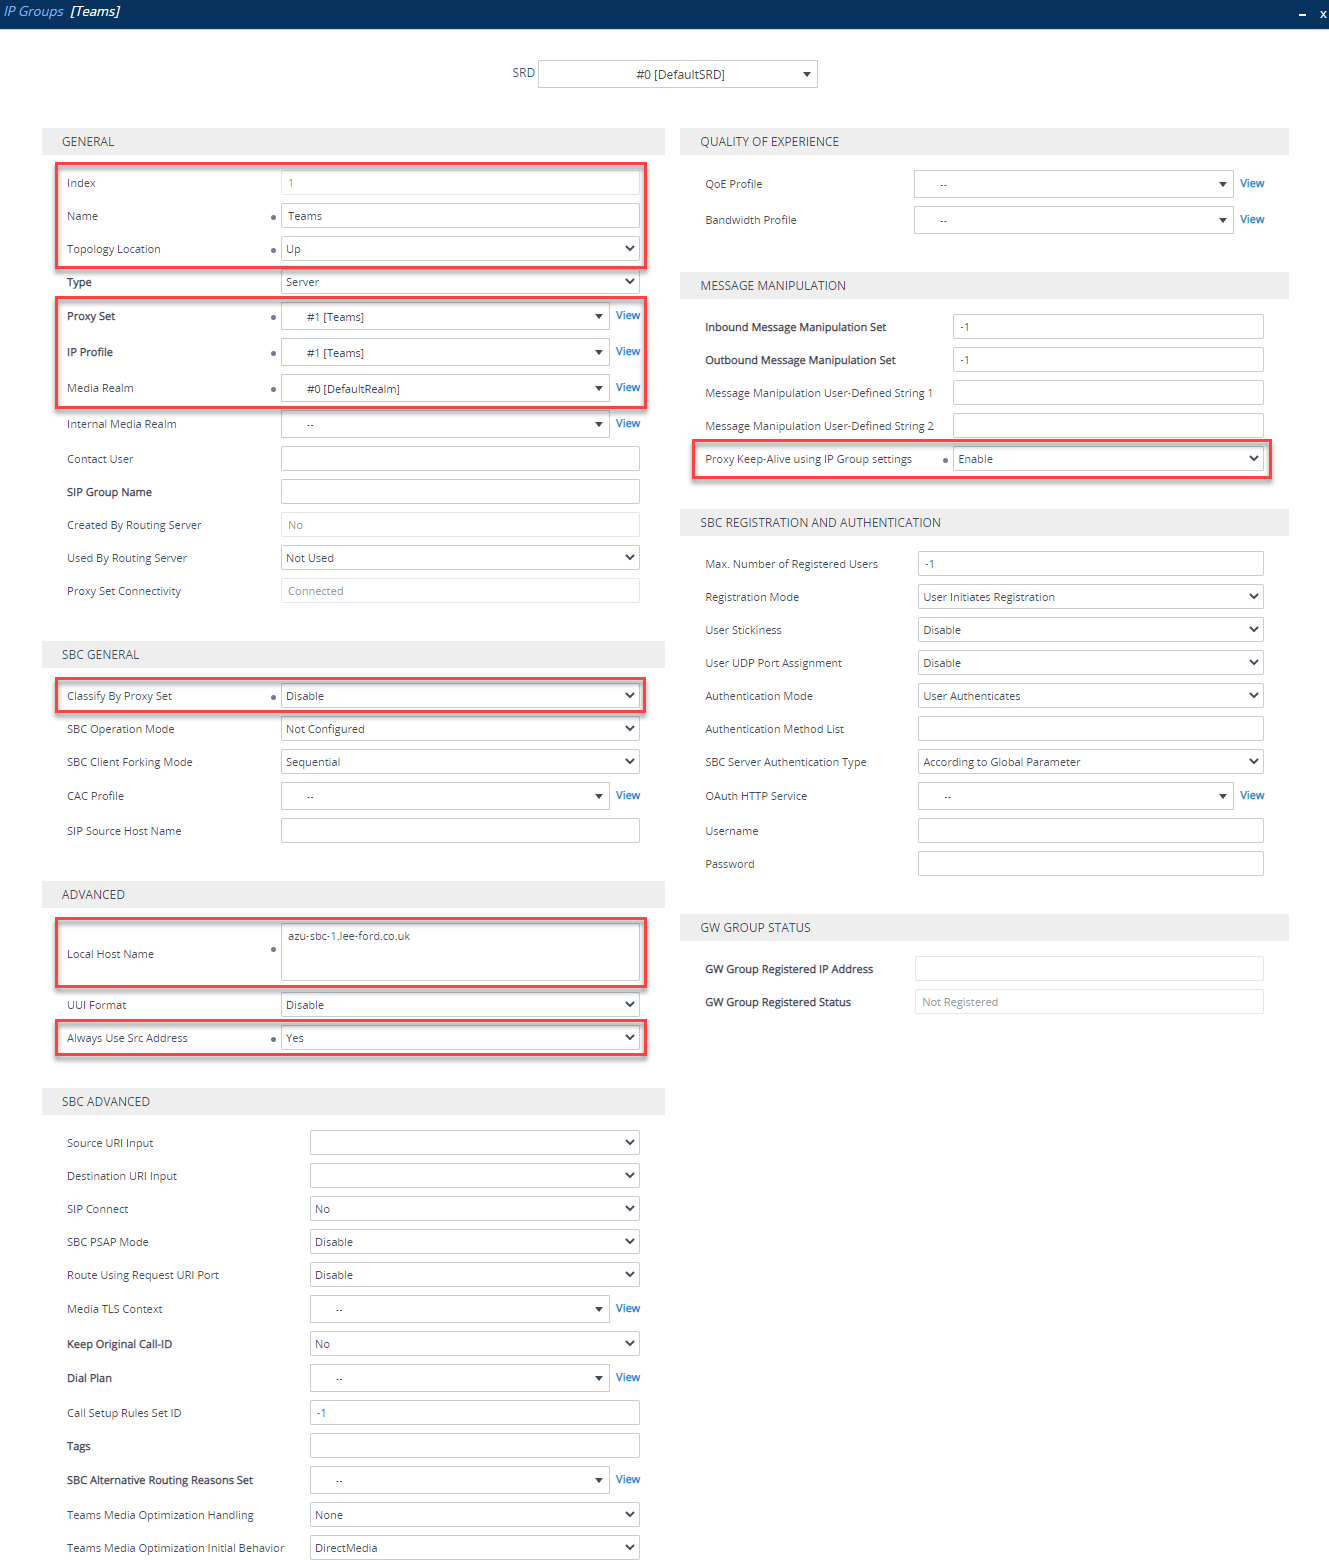
IP Group
IP Groups tie a lot of the configuration you’ve already done together. Navigate to Setup > Signaling and Media > Core Entities > IP Group. Now, set one up for Teams. You need to set up like below:
| Section | Parameter | Value |
|---|---|---|
| General | Index | Use an Index other than 0 |
| General | Name | Teams (arbitrary name) |
| General | Topology Location | Up |
| General | Proxy Set | Teams (created previously) |
| General | IP Profile | Teams (created previously) |
| General | Media Realm | Media realm attached to “WAN facing” interface (created previously) |
| SBC General | Classify By Proxy Set | Disable |
| Advanced | Local Host Name | FQDN of SBC e.g. sbc.domain.com |
| Advanced | Always Use Src Address | Yes |
| Message Manipulation | Proxy Keep-Alive using IP Group settings | Enable |
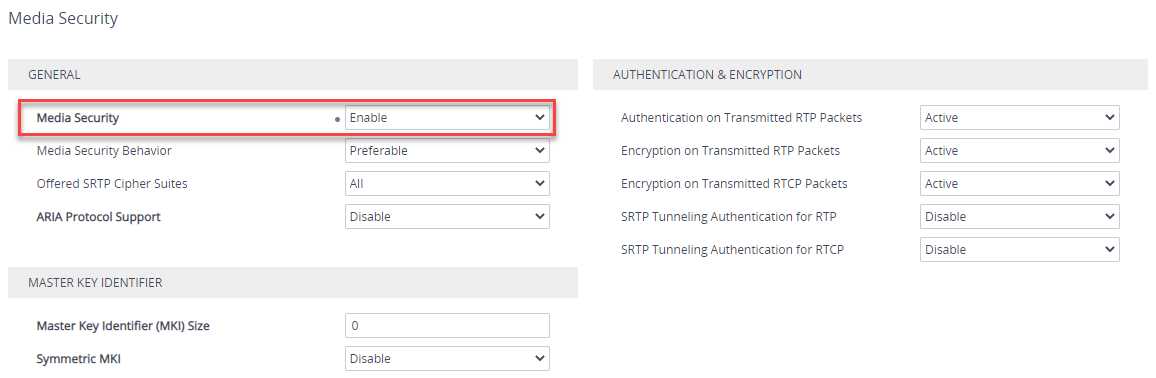
SRTP
Navigate to Setup > Signaling and Media > Media > Media Security and make sure Media Security is Enabled and the Media Security Behavior is set to Preferable (Use SRTP when you can).
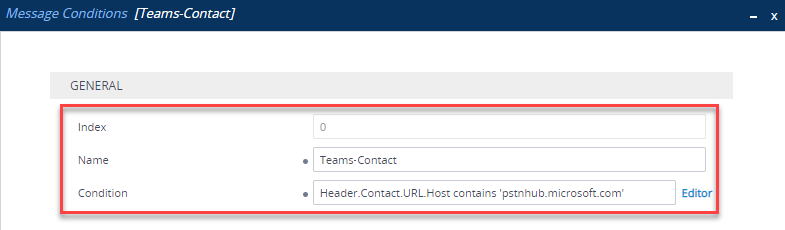
Message Condition Rule
Navigate to Signalling and Media > Message Manipulation > Message Conditions. Here you need to create a condition that only accepts SIP messages that have contain ‘pstnhub.microsoft.com’ in the Contact Header. Click New and enter the following:
| Parameter | Value |
|---|---|
| Index | 0 |
| Name | Teams-Contact (arbitrary name) |
| Condition | Header.Contact.URL.Host contains ‘pstnhub.microsoft.com’ |
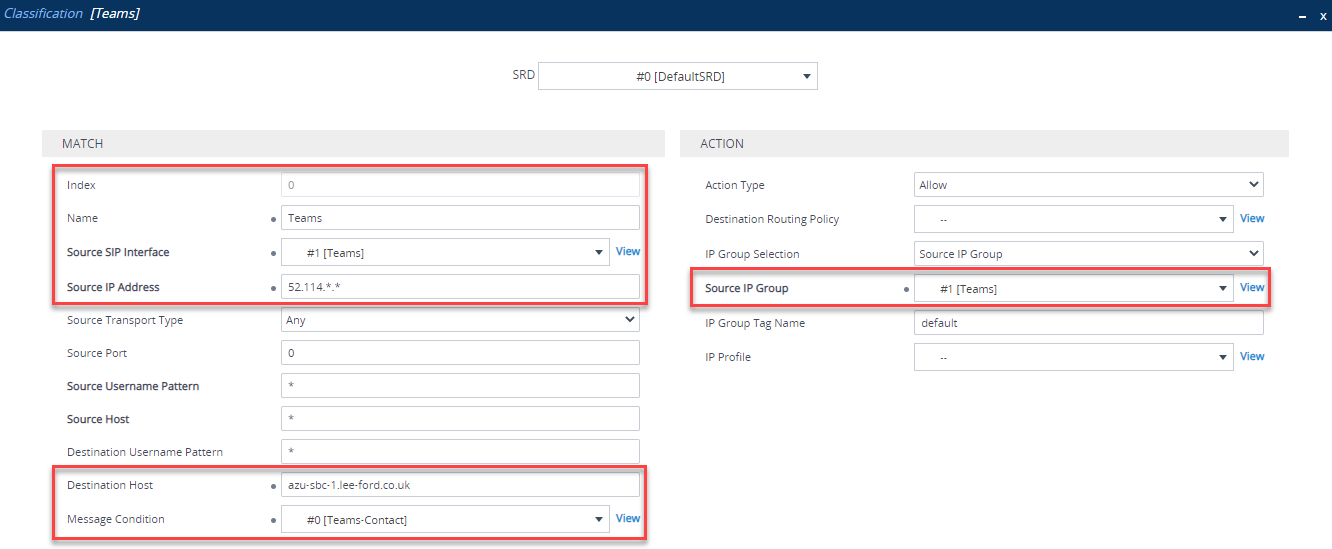
Classification Rule
Navigate to Signalling and Media > SBC > Classification. In here, using the Message Condition you just created, you can classify traffic coming from Teams IP addresses and matching the condition to the Teams IP group. Without classification, the SBC will be unable to determine what the traffic is and where it needs to go. Configure as below:
| Parameter | Value |
|---|---|
| Index | 0 |
| Name | Teams (arbitrary name) |
| Source SIP Interface | Teams (created previously) |
| Source IP Address | 52.114.. (Teams IP range) |
| Destination Host | FQDN of SBC e.g. sbc.domain.com |
| Message Condition | Teams-Contact (created previously) |
| Action Type | Allow |
| Source IP Group | Teams (created previously) |
IP-to-IP Call Routing Rules
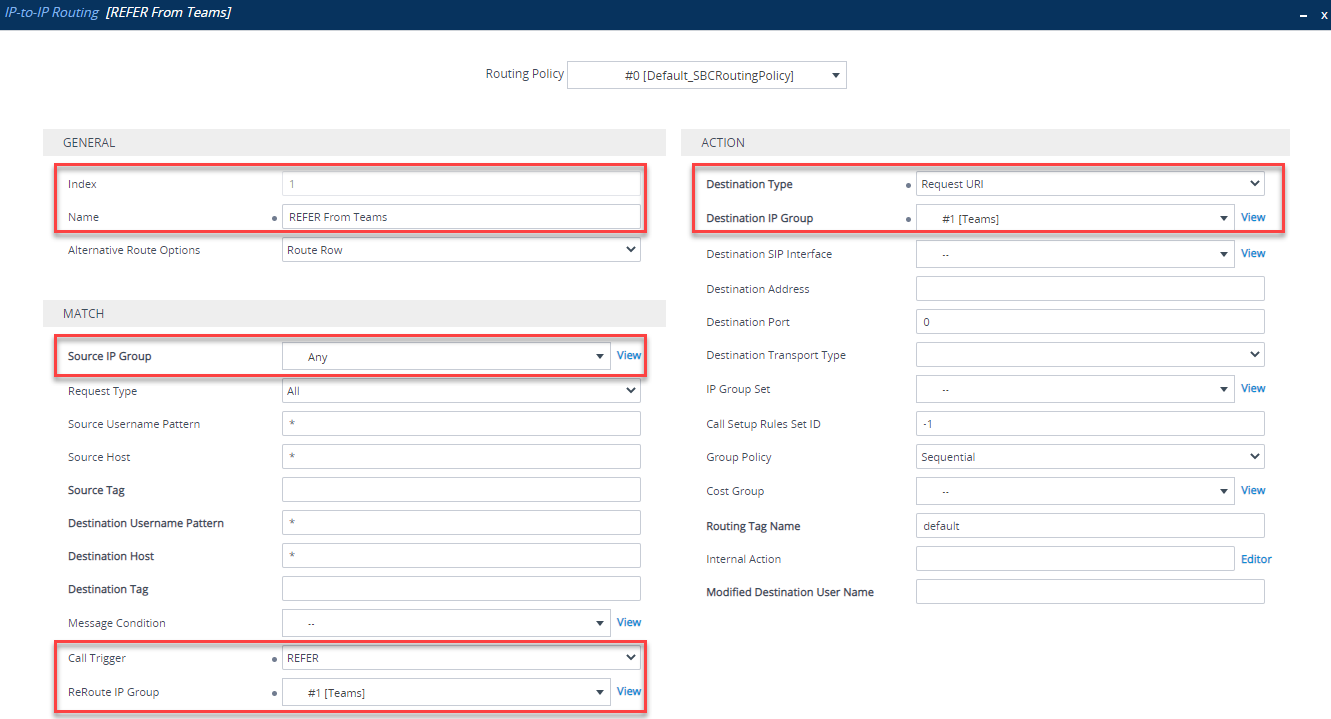
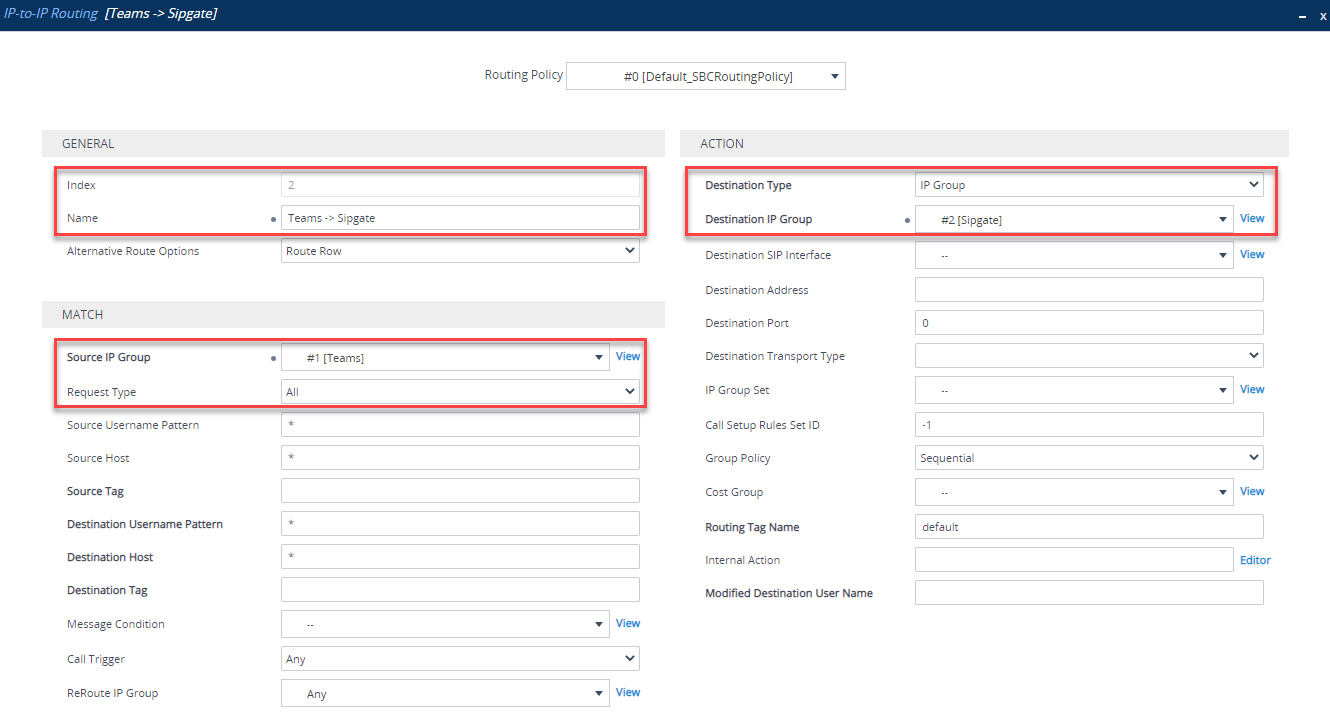
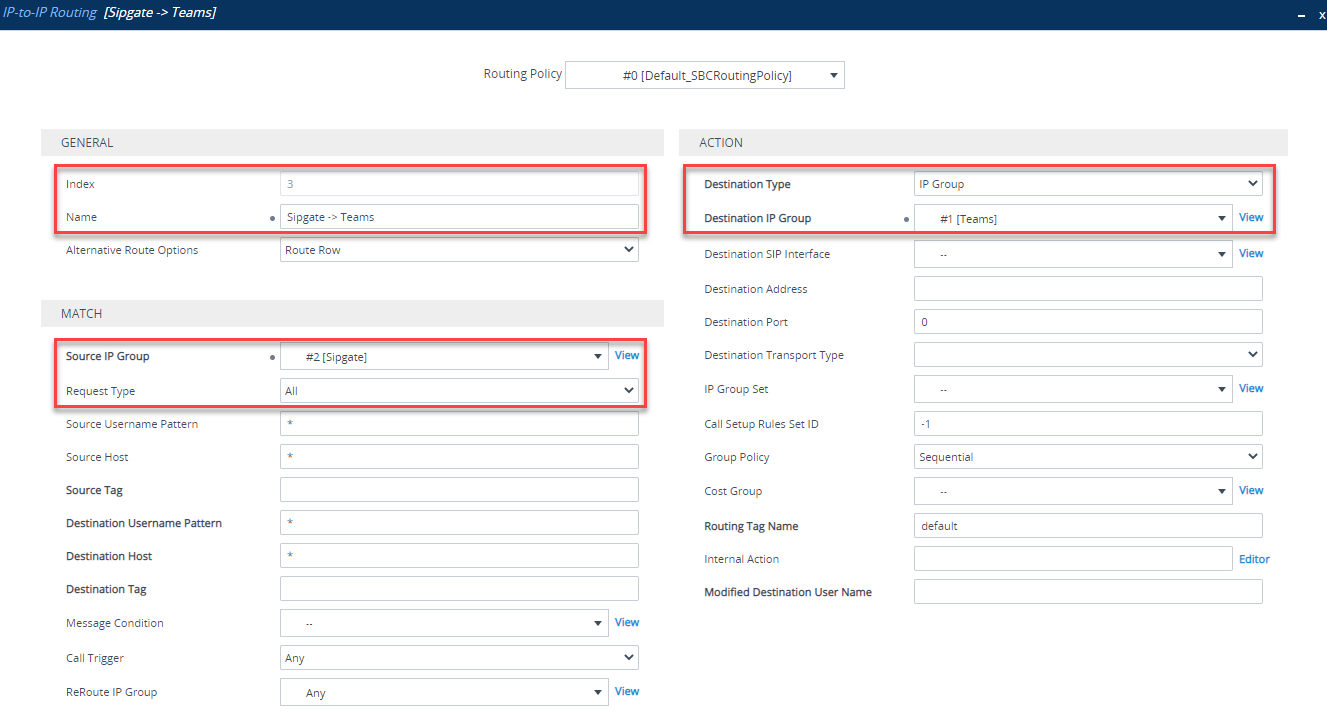
These rules are used to route (or not route) IP to IP calls/traffic. Navigate to Setup > Signaling and Media > SBC > Routing > IP-to-IP Routing. Here, you need to create 4 routing rules, in this order:
| Index | Name | Source IP Group | Request Type | Call Trigger | ReRoute IP Group | Destination Type | Destination IP Group | Destination Address |
|---|---|---|---|---|---|---|---|---|
| 0 | Terminate OPTIONS | Any | OPTIONS | Dest Address | internal | |||
| 1 | REFER From Teams | Any | REFER | Teams | Request URI | Teams | ||
| 2 | Teams -> SIP Trunk | Teams | IP Group | SIP Trunk (or whatever you called it) | ||||
| 3 | SIP Trunk -> Teams | SIP Trunk (or whatever you called it) | IP Group | Teams |
Terminate OPTIONS between IP groups. This keeps OPTIONS local to the SBC and does not proxy them between IP Groups:

REFER rule that allows Teams to transfer calls correctly
Route calls from Teams IP group to your SIP trunk IP group (in my case - Sipgate)
Route calls from your SIP Trunk IP group (in my case - Sipgate) to your Teams IP group. If you were running co-existence with Skype for Business, you could change the Destination Username to route only a certain DDI/range
You should now have 4 routes defined:

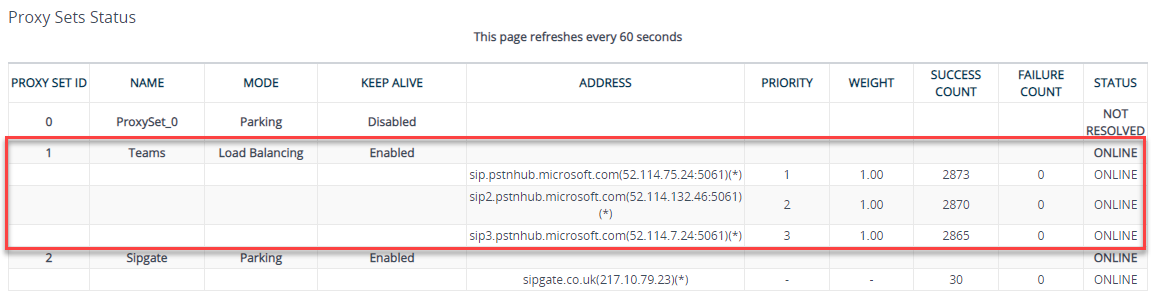
Verify SBC Connection to Teams
That’s it for SBC configuration! - you should now have enough for the SBC to connect to Teams. If you look at Monitor > VOIP Status > Proxy Set Status it should show as online for all 3 regions:
Configure Office 365
With the SBC side configured, it is time to move on to Teams/Office 365 configuration. Connect to Skype Online using the Skype Online PowerShell connector.
Add SBC as a PSTN Gateway
Once connected via PowerShell, you should now have some new cmdlets:

You will now add the SBC to Teams using the New-CSOnlinePSTNGateway cmdlet:
New-CsOnlinePSTNGateway -Fqdn <SBC FQDN> -SipSignallingPort <SBC TLS Port Defined in SIP Interface> -MaxConcurrentSessions <Amount of SBC sessions you are licensed for> -Enabled $true
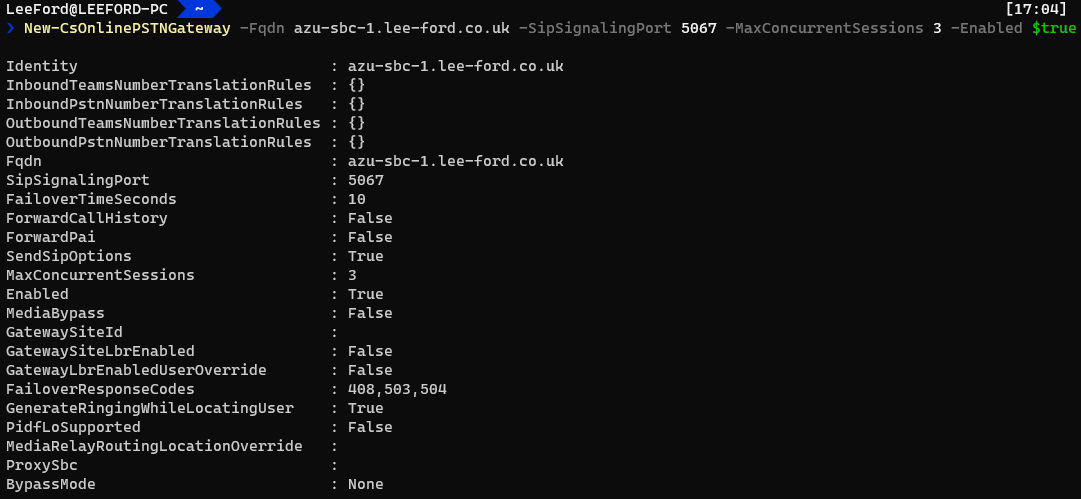
You can see there are some additional parameters that you may want to set:
| Parameter | Value |
|---|---|
| TranslationRules | Rules to manipulate inbound/outbound source/destination numbers - I would typically handle this on the SBC itself |
| FailoverTimeSeconds | How long to wait for the SBC to respond. If it doesn’t respond, failover to another SBC on the list (if there is one). With SBCs where there may be significant latency this may need to be increased |
| ForwardCallHistory | Show history of the call e.g. transfers with History-Info and Referred-By SIP headers |
| ForwardPAI | If you wish to verify the identity of the caller using P-Asserted-Identity (PAI) SIP header, use this. Note: It will force the FROM SIP header as anonymous |
| MediaRelayRoutingLocationOverride | If your SBC’s public IP address registered country location (e.g. GB) is different to the actual location of the SBC, you can specify the location of the SBC here |
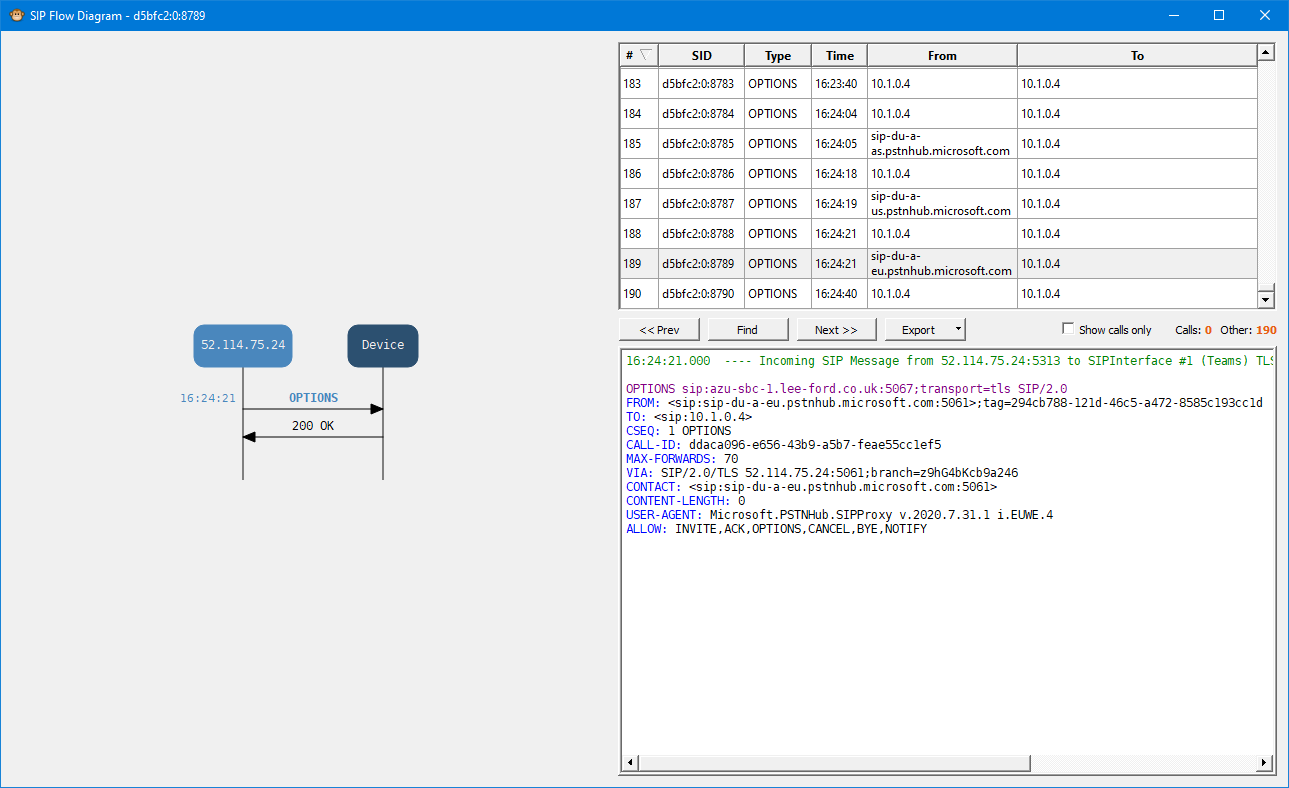
If you are able to check the Syslog of the SBC, you can see incoming requests from the Teams SIP Proxy, which verifies Teams is able to reach the SBC:
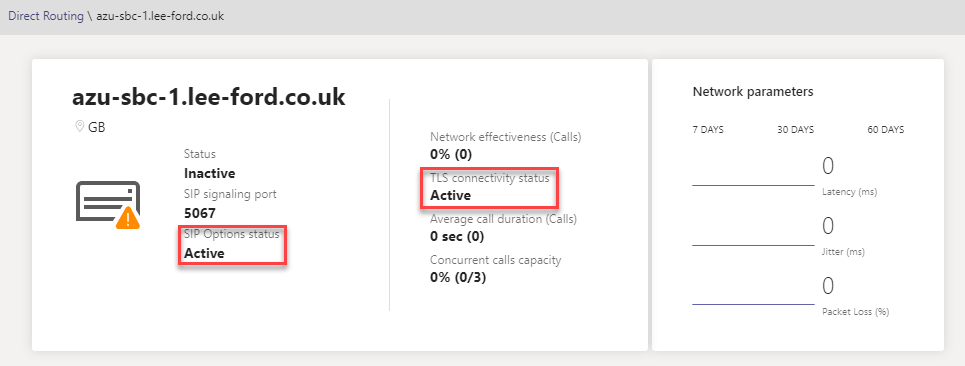
This can also be verified in the Teams Admin Centre under Voice > Direct Routing:
Enable User(s) for Calling
For each user make sure they have the correct licenses assigned e.g. E3 with Phone System. Then, run the following command to enable them for calling:
Set-CsUser -Identity "<UserUPN>" -EnterpriseVoiceEnabled $true -HostedVoiceMail $true -OnPremLineURI tel:<E.164 Tel Number>

Configure Voice Routing
Much like on-premises Skype for Business, you have number normalisation rules, voice policies, PSTN usages and routes. This can get quite complex if you aren’t familiar, but essentially calls are based on permissions (Online Voice Routing Policies) and the number called (Online Voice Routes).
To keep things simple, in my scenario I have one Online Voice Routing Policy, one PSTN usage, one Voice Route and one SBC.
It can be confusing as there are Voice Policies (used with Calling Plans) and Online Voice Routing Policies (used with Direct Routing) in Teams. You need to use Online Voice Routing Policies.
Create a PSTN Usage - Here you add a PSTN Usage to the Global list using Set-CSOnlinePSTNUsage:
Set-CsOnlinePstnUsage -Identity Global -Usage @{Add="<PSTN Usage Name>"}

In my scenario, I’ve added a single PSTN usage for the UK - which will be unrestricted. You should really add a PSTN usage for each country and for call destinations e.g. international, emergency, premium etc.
Create an Online Voice Route - Now you can add an Online Voice Route. This ties PSTN usages to SBC(s) (PSTNGateways) with a regex pattern to match against. If it matches, it sends the call to the defined SBC(s):
New-CSOnlineVoiceRoute -Identity "<Route Name>" -NumberPattern "<Regex>" -OnlinePstnGatewayList <SBC FQDN> -Priority <Num> -OnlinePstnUsages "<PSTN Usages>"

This is a “catch all” regular expression where all calls will be matched. You could list more than one SBC and calls would be load balanced. Ideally you would want to replace the regex to something more specific.
Create an Online Voice Routing Policy - Using the PSTN Usage(s) and their defined Online Voice Route(s), you need to create an Online Voice Routing Policy. It is effectively a list of allowed telephone number patterns and routes (and their priority) for a User:
New-CSOnlineVoiceRoutingPolicy "<Name>" -OnlinePstnUsages "<PSTN Usages>"

I’ve created an Online Voice Routing Policy for UK users and have assigned the UK PSTN Usage to it.
Grant Voice Routing Policy for each user - With the newly created policy - assign it to each user:
Grant-CsOnlineVoiceRoutingPolicy -Identity <UserUPN> -PolicyName <Policy>

It is common for this to fail with “Policy xxxxx is not a user policy” if assigning it just after creating it. Leave it an hour or so and it should work
Once this is setup the call flow works like this:
- A user makes a call
- Based on the Online Voice Routing Policy a list of PSTN Usages is returned
- The Online Voice Routes that are tied to the PSTN Usages are checked to see if the number matches any. If it does, the call is sent to the SBC(s) in the Online Voice Route with the highest priority
- If for whatever reason the call cannot be routed via the Online Voice Route (e.g. SBC(s) offline), then the remaining matching Online Voice Routes in that PSTN Usage are used
- If there are no working Online Voice Routes found and the user has a Calling Plan assigned, this is used as a last resort
Assign a Teams Upgrade Policy - REMINDER: Each user will need to have a Teams Upgrade Policy (coexistence mode) of Teams Only (UpgradeToTeams) for Direct Routing. This can be done by doing the following:
Grant-CSTeamsUpgradePolicy -Identity <UserUPN> -PolicyName UpgradeToTeams

If the Global Policy is Teams Only, you may not need to assign the policy to the user
Wrap up
And that should be it. Hopefully you found it fairly straight forward. By the end, you will have a SIP connection established to Teams and be able to route calls to and from Teams.