Introduction
As of December 2025, this feature is in public preview - more information can be found in the official documentation. Whilst it is possible to shortcut some these steps by using the Azure AI Search SharePoint agentic knowledge source, this doesn’t produce great results with Copilot out of the box, for example citations don’t link back to the original SharePoint document.
Whilst in theory, M365 Copilot agents can use a built-in SharePoint knowledge source that leverages a semantic index, in practice, it can be hit and miss (inconsistent, not always matching to most relevant content, etc.).
At the same time, until recently, it was not possible to directly index SharePoint content using Azure AI Search - you had to export the content from SharePoint to an intermediate location such as Azure Blob Storage first.
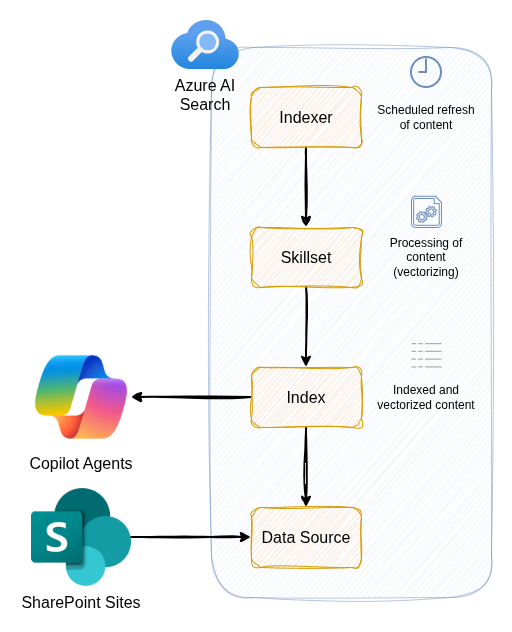
However, using the new SharePoint indexer in Azure AI Search, we can get the following benefits:
- More control over how the content is indexed and vectorised
- More control over which content is indexed (e.g. specific libraries, content types etc.)
- Better performance and reliability (this is subjective, but in my experience it has been better)
- Include the documents in citations from Copilot and link back the actual document in SharePoint (previously we would need to link back to a copy in something like Blob Storage)
Pre-requisites
You will need the following to get started:
- Azure AI Search instance (Basic tier and above is required)

- Microsoft Foundry or Azure OpenAI instance (either will work as both have access to the required OpenAI models - I went for OpenAI for simplicity)

Azure AI Search
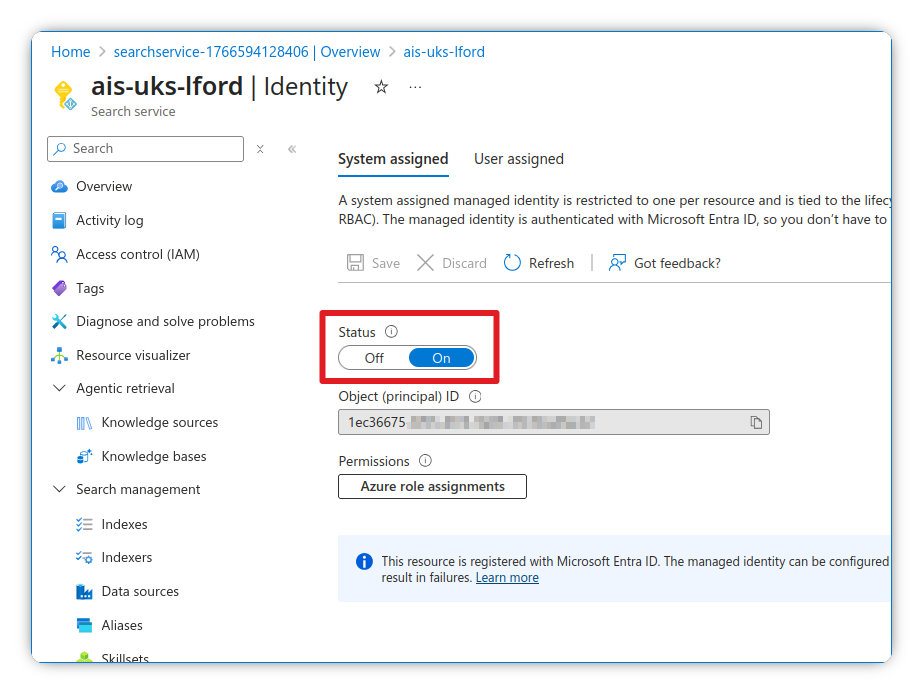
First, we need to enable the system-assigned Managed Identity so that we can have a secret-less solution from end to end. This will make it more secure and also ensure there is no management of keys required.
Enable system assigned Managed Identity
- Navigate to your Azure AI Search instance
- Go to Settings > Identity
- Enable the System assigned Managed Identity
- Make a note of the Object ID for later
Assign Azure role
- Under Azure role assignments, click Add role assignment
- Assign the Cognitive Services OpenAI User role to the Managed Identity
- This will allow us to authenticate with the OpenAI models without an API key (more secure)

Azure Open AI/Foundry
When indexing, vectorising and retrieving the data from within a SharePoint site, we will use OpenAI models.
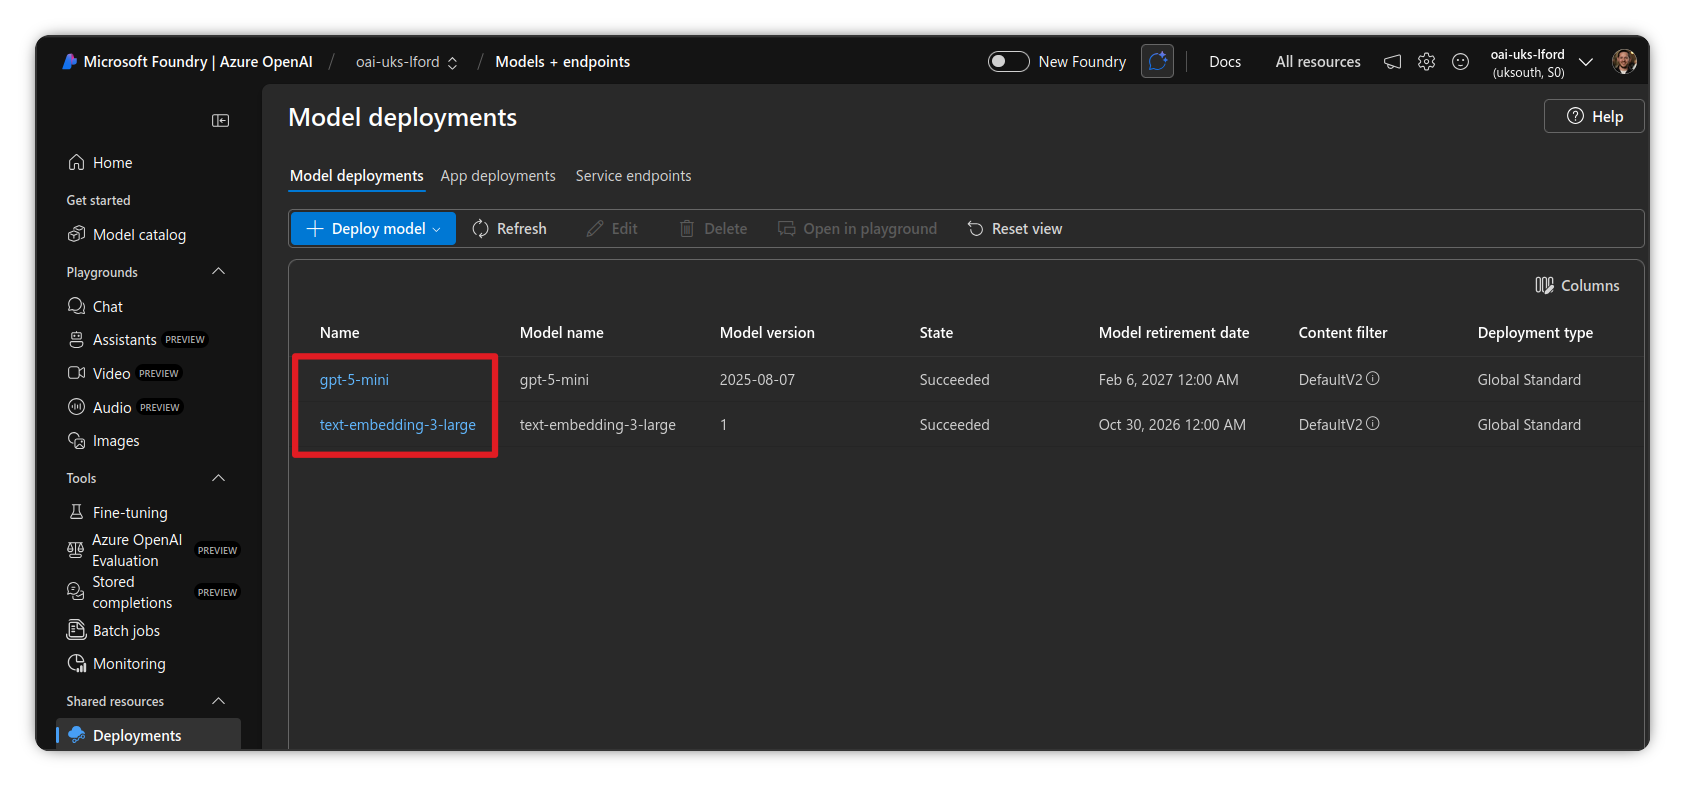
Deploy required model
- Go to https://ai.azure.com and choose the instance you wish to use
- Navigate to Deployments
- If you don’t already have it, add the following model:
- A text embedding model:
text-embedding-3-large
- A text embedding model:
App registration
You will need to create an App Registration with permissions to read the contents of SharePoint from Azure AI Search. You can use application permissions or delegated permissions, but it is recommended to use application permissions due to limitations with delegated permissions such as token expiry after 75 minutes forcing manual indexing from that point onwards.
As with any application level permission, it is granted tenant-wide, and will have access to all SharePoint sites, so bear that in mind!
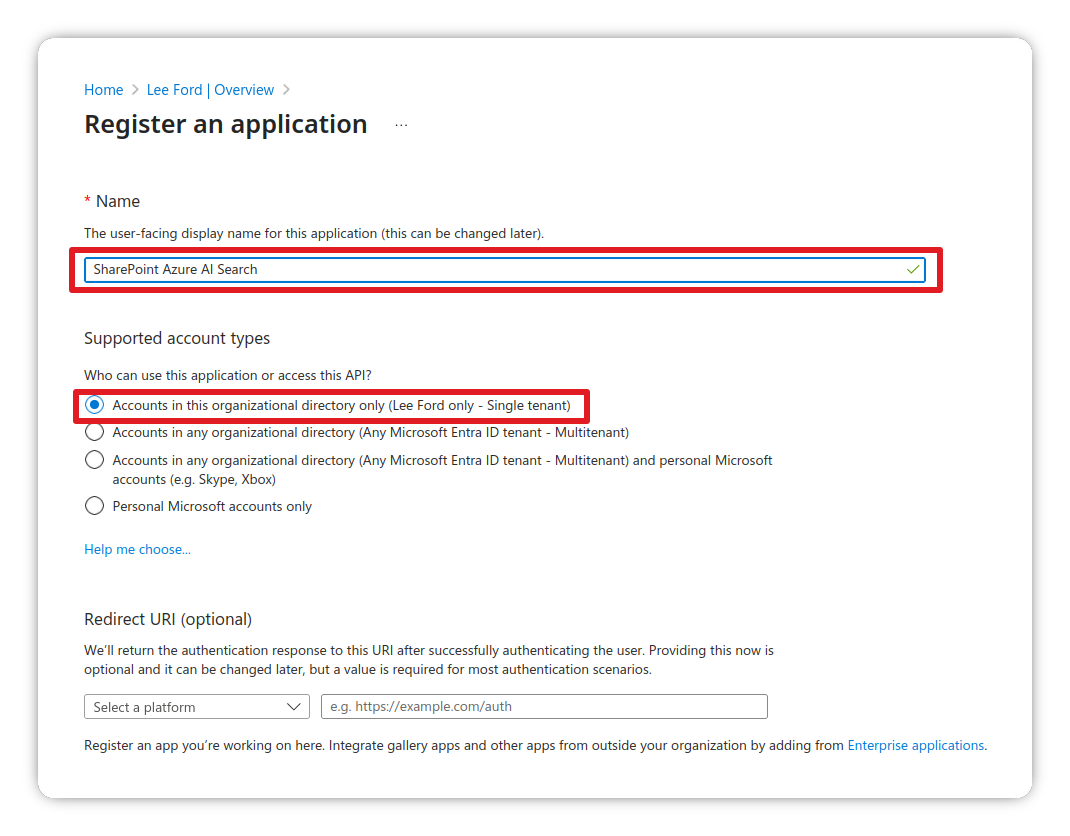
Create the App Registration
- Login to the Azure Portal and navigate to Entra ID
- Go to Manage > App Registrations
- Click New registration
- Give it a name and set Supported account types to Single Tenant
- Click Register
- Once created, make a note of the Application (client) ID for later
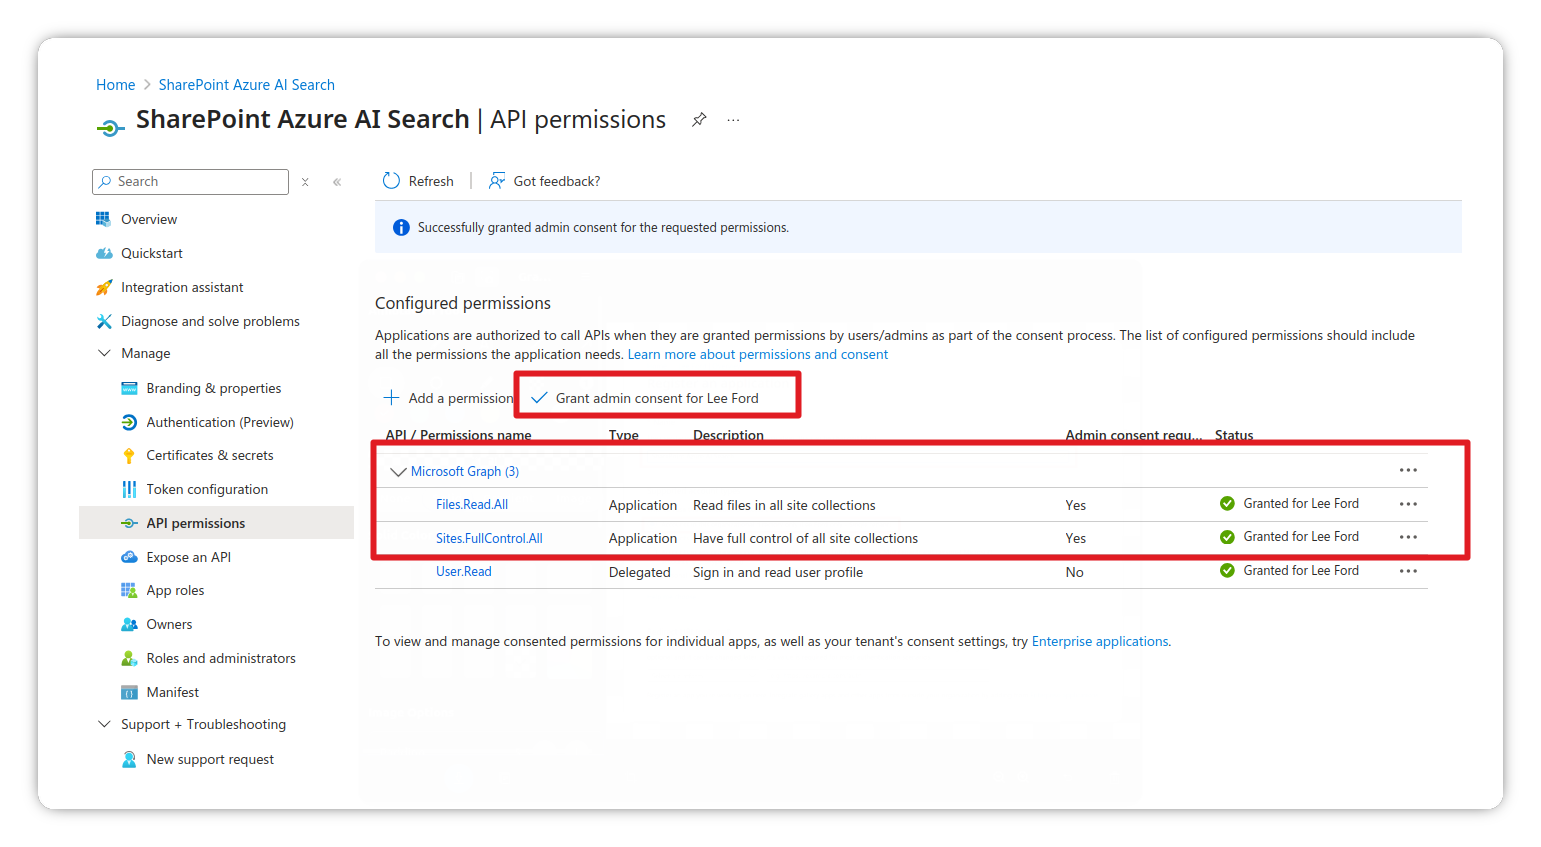
Configure API permissions
- Go to Manage > API permissions
- Click Add a permission and add the following:
Files.Read.AllSites.FullControl.All
- Click Grant admin consent for the permissions
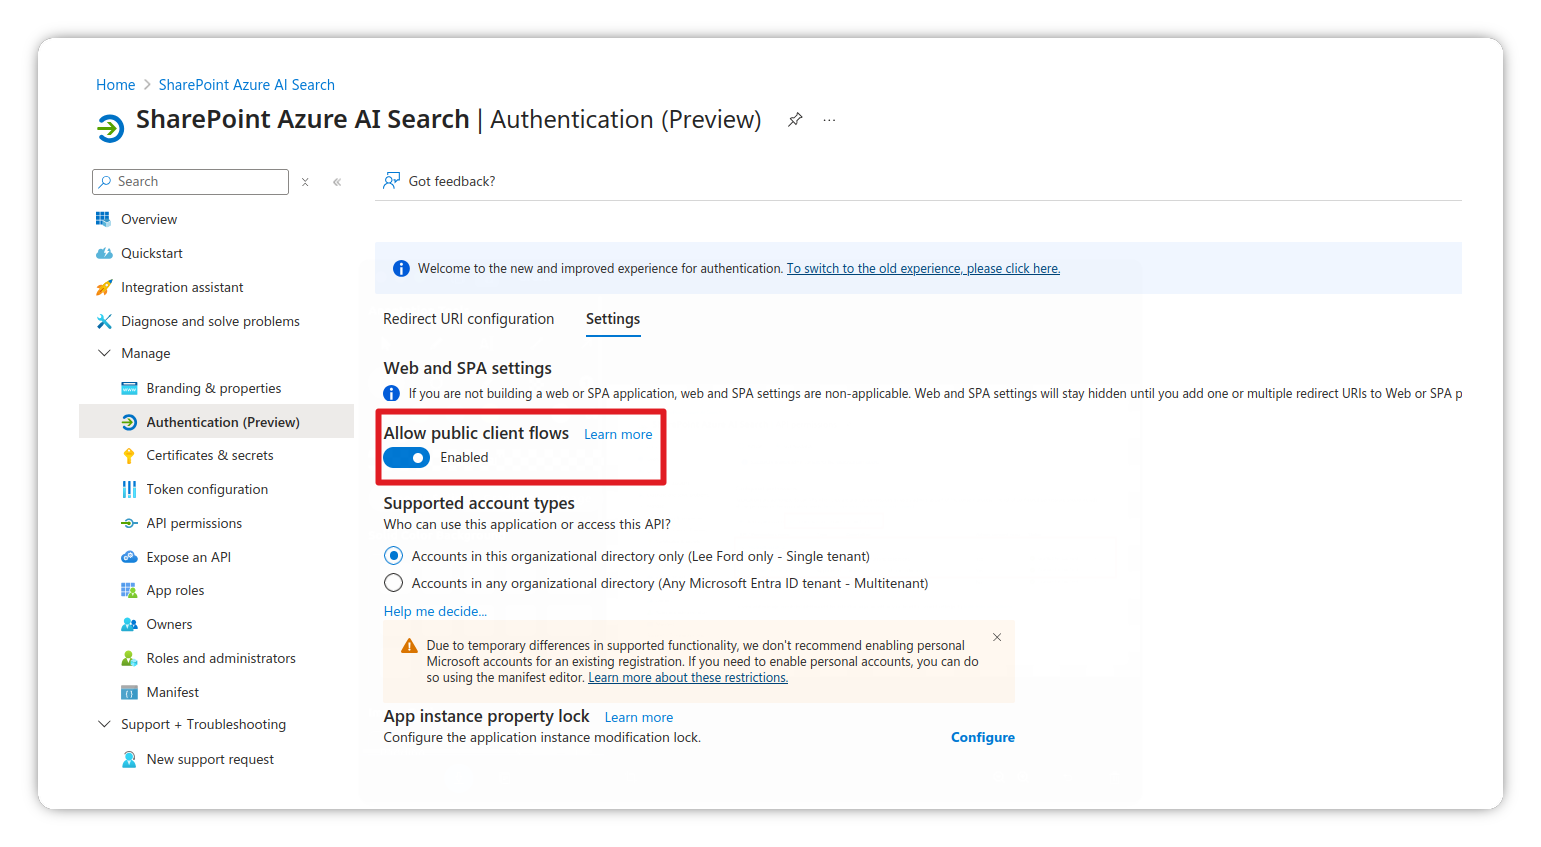
Enable public client flows
- Go to Manage > Authentication
- Under Advanced settings, enable Allow public client flows
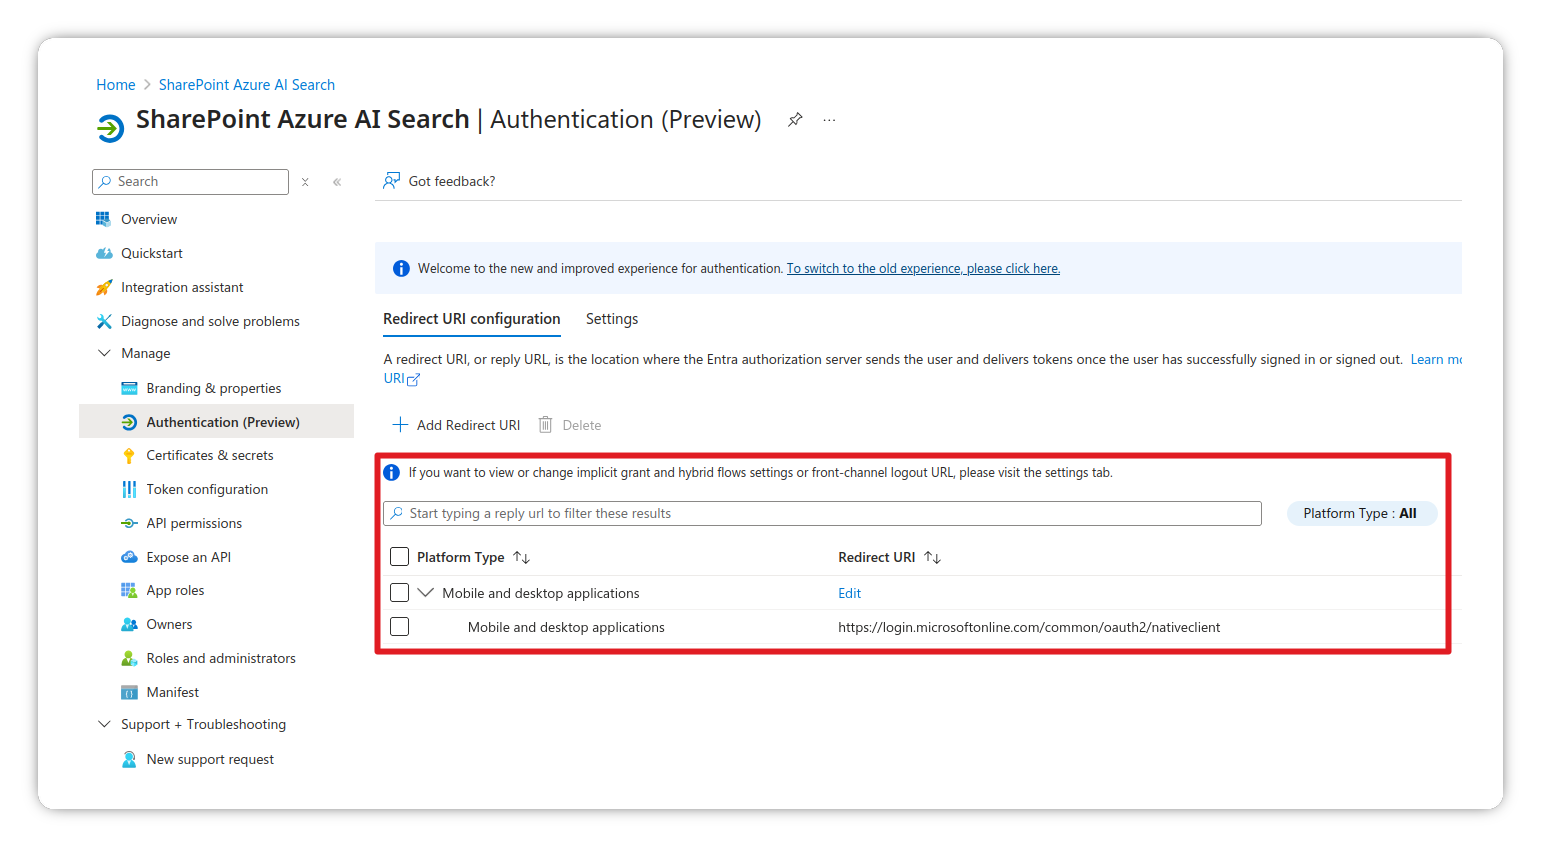
Add redirect URI
- Under Platform configurations, click Add a platform
- Select Mobile and desktop applications
- Set the Redirect URI to
https://login.microsoftonline.com/common/oauth2/nativeclient - Click Configure
Configure federated credentials (Managed Identity)
Because we’re not monsters, we will use Managed Identity to authenticate the App Registration from Azure AI Search instead of using client secrets.
- Go to Manage > Certificates & secrets
- Select the Federated credentials tab
- Click Add credential
- Set the Federated credential scenario to Managed Identity
- Select the Managed Identity and confirm the Object ID matches from earlier
- Provide it with a Name and click Add

Configure Azure AI Search to index SharePoint
Create data source
- Navigate to your Azure AI Search instance
- Go to Search management > Data sources
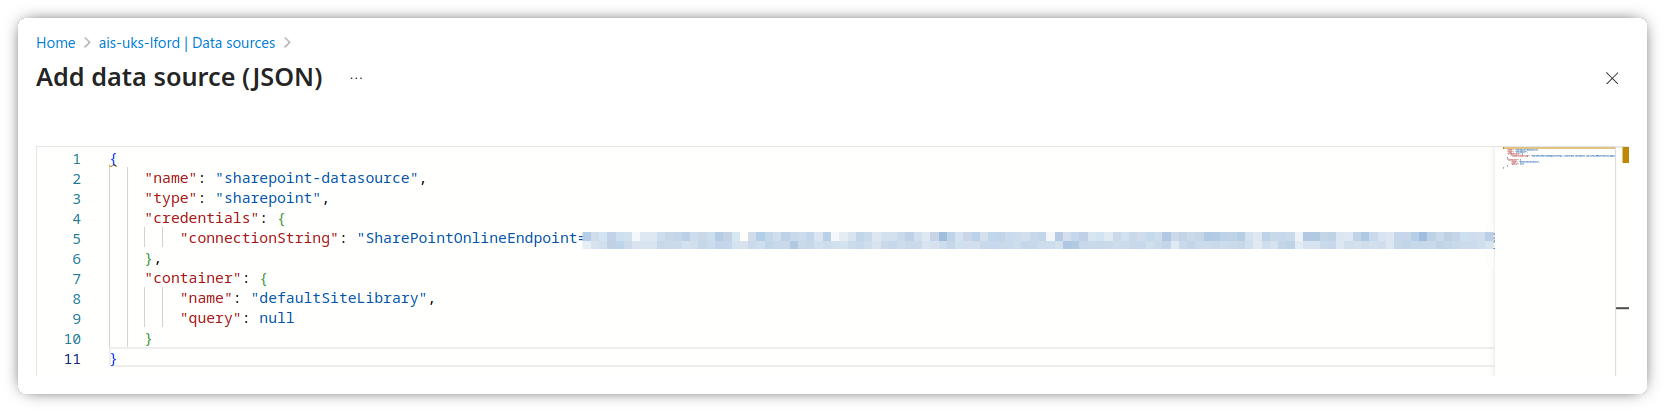
- Click Add data source (JSON) and use the following schema
You will need to modify the following:
- Under the connectionString:
- {{SharePoint Site URL}} should be something like https://tenantname.sharepoint.com/sites/sitename
- {{App Registration Client ID}} is the App Registration Client ID from earlier
- {{Managed Identity Object ID}} is the system assigned Managed Identity Object ID from earlier
- {{Tenant ID}} is the tenant ID of the tenant where the site is hosted
{
    "name": "sharepoint-datasource",
    "type": "sharepoint",
    "credentials": {
        "connectionString": "SharePointOnlineEndpoint={{SharePoint Site URL}};ApplicationId={{App Registration Client ID}};FederatedCredentialObjectId={{Managed Identity Object ID}};TenantId={{Tenant ID}};"
    },
    "container": {
        "name": "defaultSiteLibrary",
        "query": null
    }
}
- Click Create
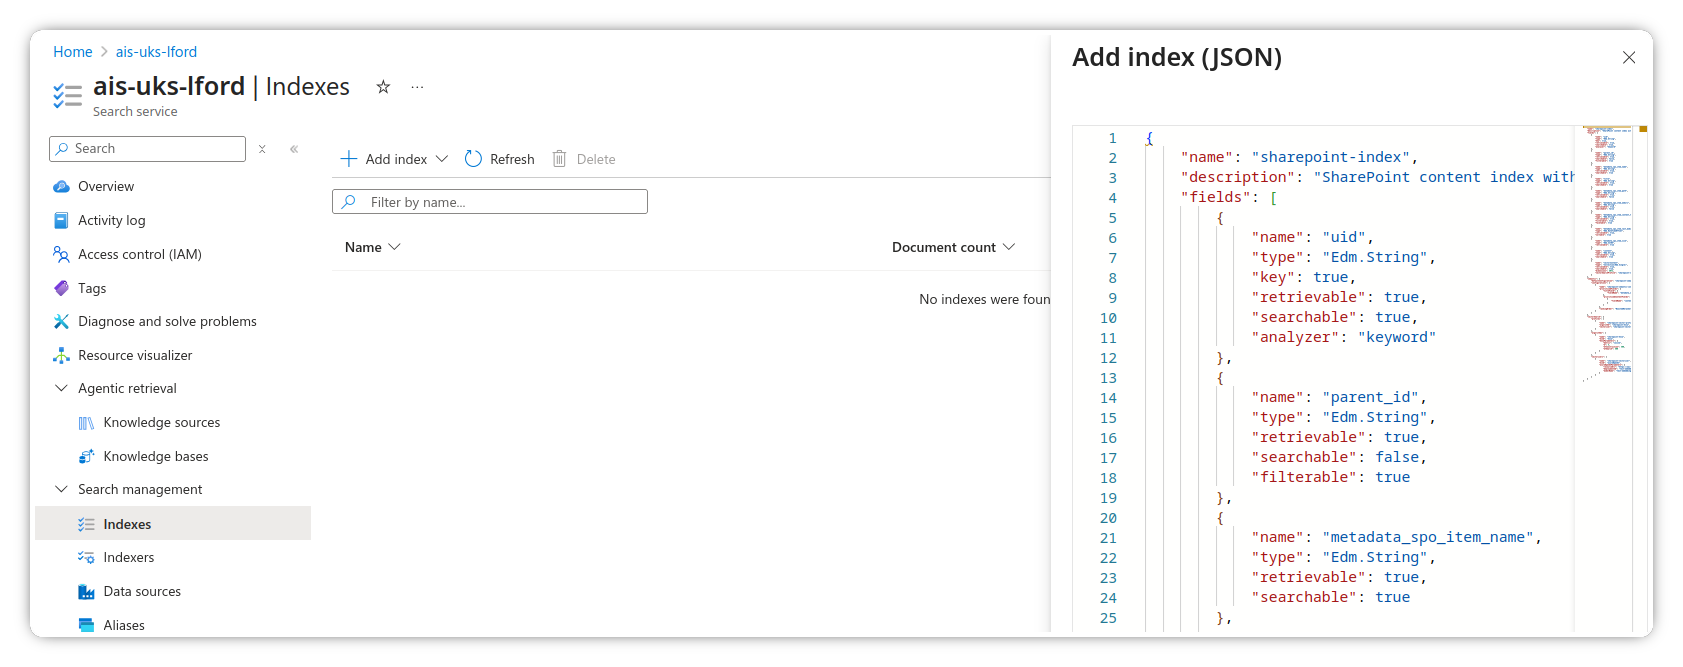
Create index
- Navigate to your Azure AI Search instance
- Go to Search management > Indexes
- Click Add index (JSON) and use the following schema
- You will need to modify the following:
- Change the {{OpenAI URI}} to your own instance
{
    "name": "sharepoint-index",
    "description": "SharePoint content index with vector search",
    "fields": [
        {
            "name": "uid",
            "type": "Edm.String",
            "key": true,
            "retrievable": true,
            "searchable": true,
            "analyzer": "keyword"
        },
        {
            "name": "parent_id",
            "type": "Edm.String",
            "retrievable": true,
            "searchable": false,
            "filterable": true
        },
        {
            "name": "metadata_spo_item_name",
            "type": "Edm.String",
            "retrievable": true,
            "searchable": true
        },
        {
            "name": "title",
            "type": "Edm.String",
            "retrievable": true,
            "searchable": true
        },
        {
            "name": "metadata_spo_item_path",
            "type": "Edm.String",
            "retrievable": true,
            "searchable": false
        },
        {
            "name": "metadata_spo_item_weburi",
            "type": "Edm.String",
            "retrievable": true,
            "searchable": false
        },
        {
            "name": "metadata_spo_item_content_type",
            "type": "Edm.String",
            "retrievable": true,
            "filterable": true,
            "facetable": true
        },
        {
            "name": "metadata_spo_item_last_modified",
            "type": "Edm.DateTimeOffset",
            "retrievable": true,
            "sortable": true
        },
        {
            "name": "metadata_spo_item_size",
            "type": "Edm.Int64",
            "retrievable": true
        },
        {
            "name": "content",
            "type": "Edm.String",
            "retrievable": true,
            "searchable": true
        },
        {
            "name": "vectorContent",
            "type": "Collection(Edm.Single)",
            "retrievable": true,
            "searchable": true,
            "dimensions": 3072,
            "vectorSearchProfile": "sharepoint-vector-profile"
        }
    ],
    "semantic": {
        "defaultConfiguration": "sharepoint-semantic-config",
        "configurations": [
            {
                "name": "sharepoint-semantic-config",
                "prioritizedFields": {
                    "titleField": {
                        "fieldName": "metadata_spo_item_name"
                    },
                    "prioritizedContentFields": [
                        {
                            "fieldName": "content"
                        }
                    ]
                },
                "rankingOrder": "BoostedRerankerScore"
            }
        ]
    },
    "vectorSearch": {
        "profiles": [
            {
                "name": "sharepoint-vector-profile",
                "algorithm": "sharepoint-hnsw",
                "vectorizer": "sharepoint-vectorizer"
            }
        ],
        "algorithms": [
            {
                "name": "sharepoint-hnsw",
                "kind": "hnsw",
                "hnswParameters": {
                    "metric": "cosine",
                    "m": 4,
                    "efConstruction": 400,
                    "efSearch": 500
                }
            }
        ],
        "vectorizers": [
            {
                "name": "sharepoint-vectorizer",
                "kind": "azureOpenAI",
                "azureOpenAIParameters": {
                    "resourceUri": "{{OpenAI URI}}",
                    "deploymentId": "text-embedding-3-large",
                    "modelName": "text-embedding-3-large"
                }
            }
        ]
    }
}
- Click Create
Create skillset
- Navigate to your Azure AI Search instance
- Go to Search management > Skillsets
- Click Add skillset (JSON) and use the following schema
- You will need to modify the following:
- Change the {{OpenAI URI}} to your own instance
{
    "name": "sharepoint-skillset",
    "description": "Skillset for vectorizing SharePoint content",
    "skills": [
        {
            "@odata.type": "#Microsoft.Skills.Text.SplitSkill",
            "name": "text-split-skill",
            "description": "Split content into chunks for vectorization",
            "context": "/document",
            "defaultLanguageCode": "en",
            "inputs": [
                {
                    "name": "text",
                    "source": "/document/content"
                }
            ],
            "outputs": [
                {
                    "name": "textItems",
                    "targetName": "pages"
                }
            ],
            "textSplitMode": "pages",
            "maximumPageLength": 2000,
            "pageOverlapLength": 500,
            "maximumPagesToTake": 0,
            "unit": "characters"
        },
        {
            "@odata.type": "#Microsoft.Skills.Text.AzureOpenAIEmbeddingSkill",
            "name": "embedding-skill",
            "description": "Generate embeddings using Azure OpenAI",
            "context": "/document/pages/*",
            "inputs": [
                {
                    "name": "text",
                    "source": "/document/pages/*"
                }
            ],
            "outputs": [
                {
                    "name": "embedding",
                    "targetName": "vector"
                }
            ],
            "resourceUri": "{{OpenAI URI}}",
            "deploymentId": "text-embedding-3-large",
            "dimensions": 3072,
            "modelName": "text-embedding-3-large"
        }
    ],
    "indexProjections": {
        "selectors": [
            {
                "targetIndexName": "sharepoint-index",
                "parentKeyFieldName": "parent_id",
                "sourceContext": "/document/pages/*",
                "mappings": [
                    {
                        "name": "vectorContent",
                        "source": "/document/pages/*/vector"
                    },
                    {
                        "name": "content",
                        "source": "/document/pages/*"
                    },
                    {
                        "name": "metadata_spo_item_name",
                        "source": "/document/metadata_spo_item_name"
                    },
                    {
                        "name": "title",
                        "source": "/document/metadata_spo_item_name"
                    },
                    {
                        "name": "metadata_spo_item_path",
                        "source": "/document/metadata_spo_item_path"
                    },
                    {
                        "name": "metadata_spo_item_weburi",
                        "source": "/document/metadata_spo_item_weburi"
                    },
                    {
                        "name": "metadata_spo_item_content_type",
                        "source": "/document/metadata_spo_item_content_type"
                    },
                    {
                        "name": "metadata_spo_item_last_modified",
                        "source": "/document/metadata_spo_item_last_modified"
                    },
                    {
                        "name": "metadata_spo_item_size",
                        "source": "/document/metadata_spo_item_size"
                    }
                ]
            }
        ],
        "parameters": {
            "projectionMode": "skipIndexingParentDocuments"
        }
    }
}

- Click Create
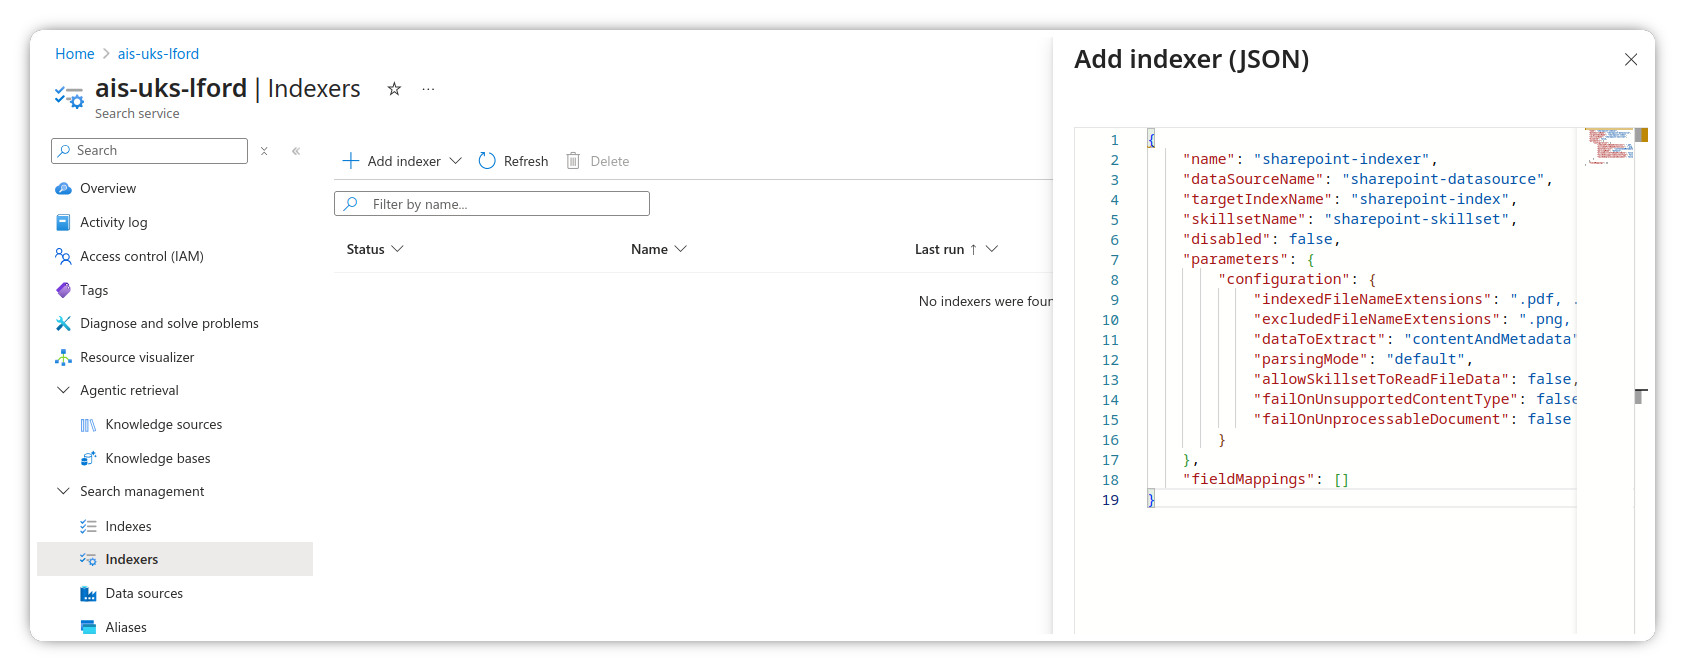
Create indexer
- Navigate to your Azure AI Search instance
- Go to Search management > Indexers
- Click Add indexer (JSON) and use the following schema
You can modify the indexedFileNameExtensions and excludedFileNameExtensions as required.
{
    "name": "sharepoint-indexer",
    "dataSourceName": "sharepoint-datasource",
    "targetIndexName": "sharepoint-index",
    "skillsetName": "sharepoint-skillset",
    "disabled": false,
    "parameters": {
        "configuration": {
            "indexedFileNameExtensions": ".pdf, .docx, .rtf, .txt",
            "excludedFileNameExtensions": ".png, .jpg",
            "dataToExtract": "contentAndMetadata",
            "parsingMode": "default",
            "allowSkillsetToReadFileData": false,
            "failOnUnsupportedContentType": false,
            "failOnUnprocessableDocument": false
        }
    },
    "fieldMappings": []
}
- Click Create
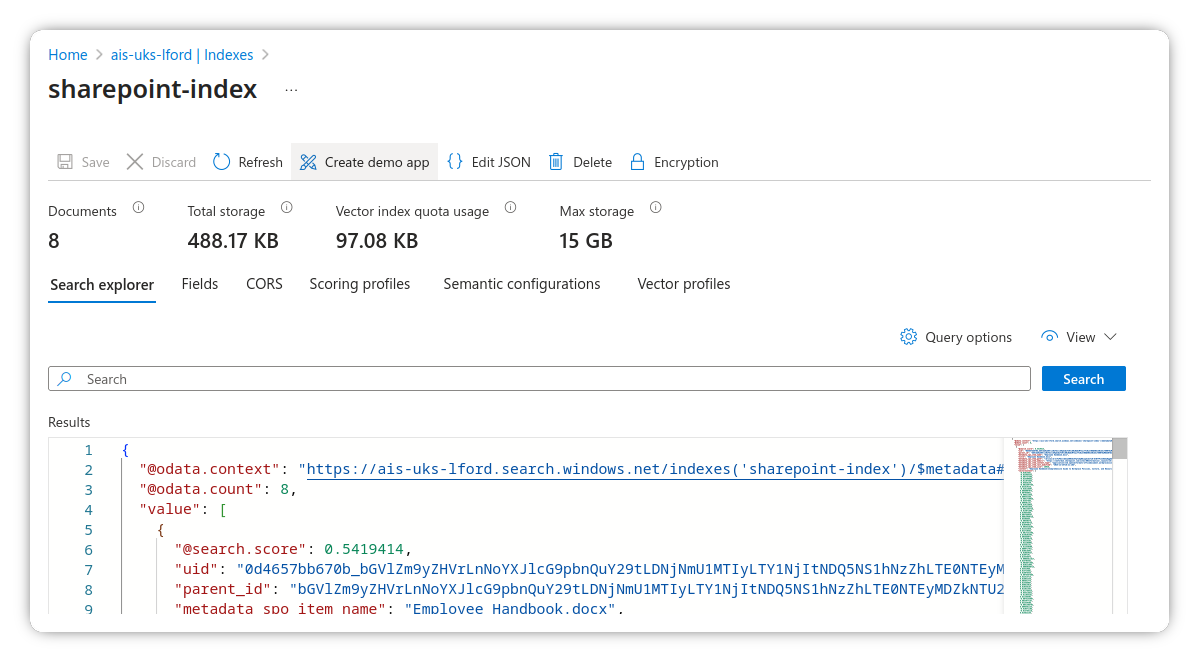
Verify the index
You should now have a data source, skillset, indexer and index created.
- Navigate to Search management > Indexes
- Click on the newly created index
- You should see indexed documents after a few minutes (assuming there are documents in the site)
Add knowledge source to a Copilot agent
The final step is to add the newly created index as a knowledge source to a Copilot agent.
- Navigate to the Copilot agent you wish to add the knowledge source to
- Go to Knowledge > Add knowledge
- Select Azure AI Search from the list
- If prompted to create a connection, do so by providing the required details (use API key method)
- You should see the index
sharepoint-indexavailable to select - Select it and click Add to agent
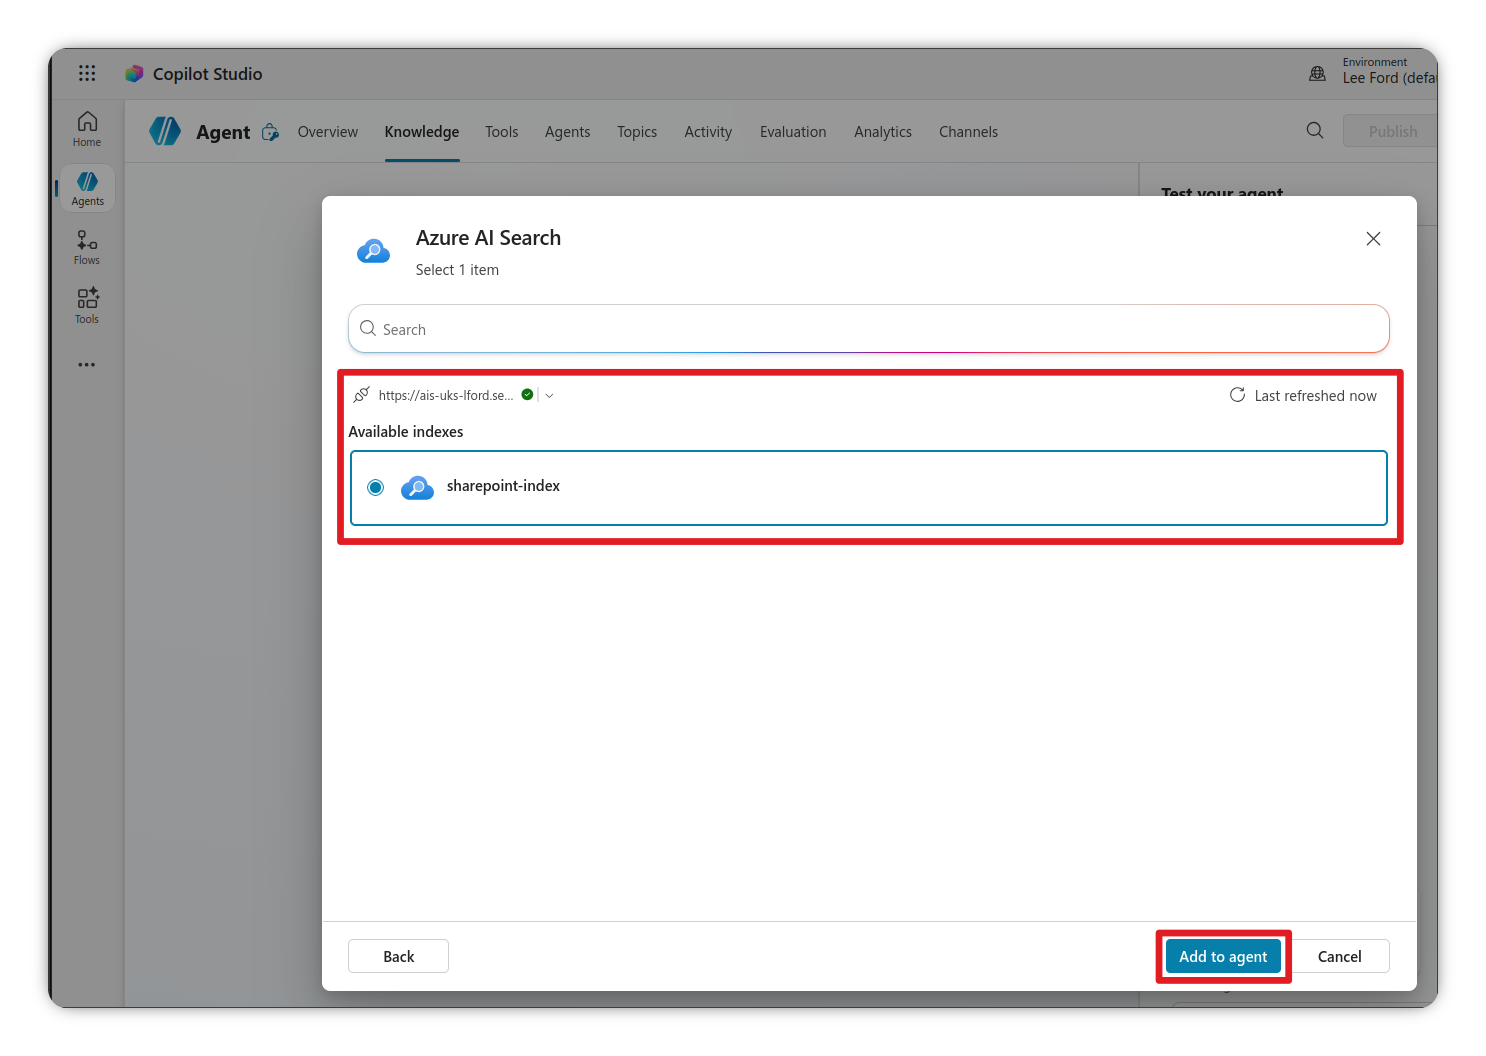
- Once added, you can now use the Copilot agent to query the SharePoint content indexed in Azure AI Search, including citations.
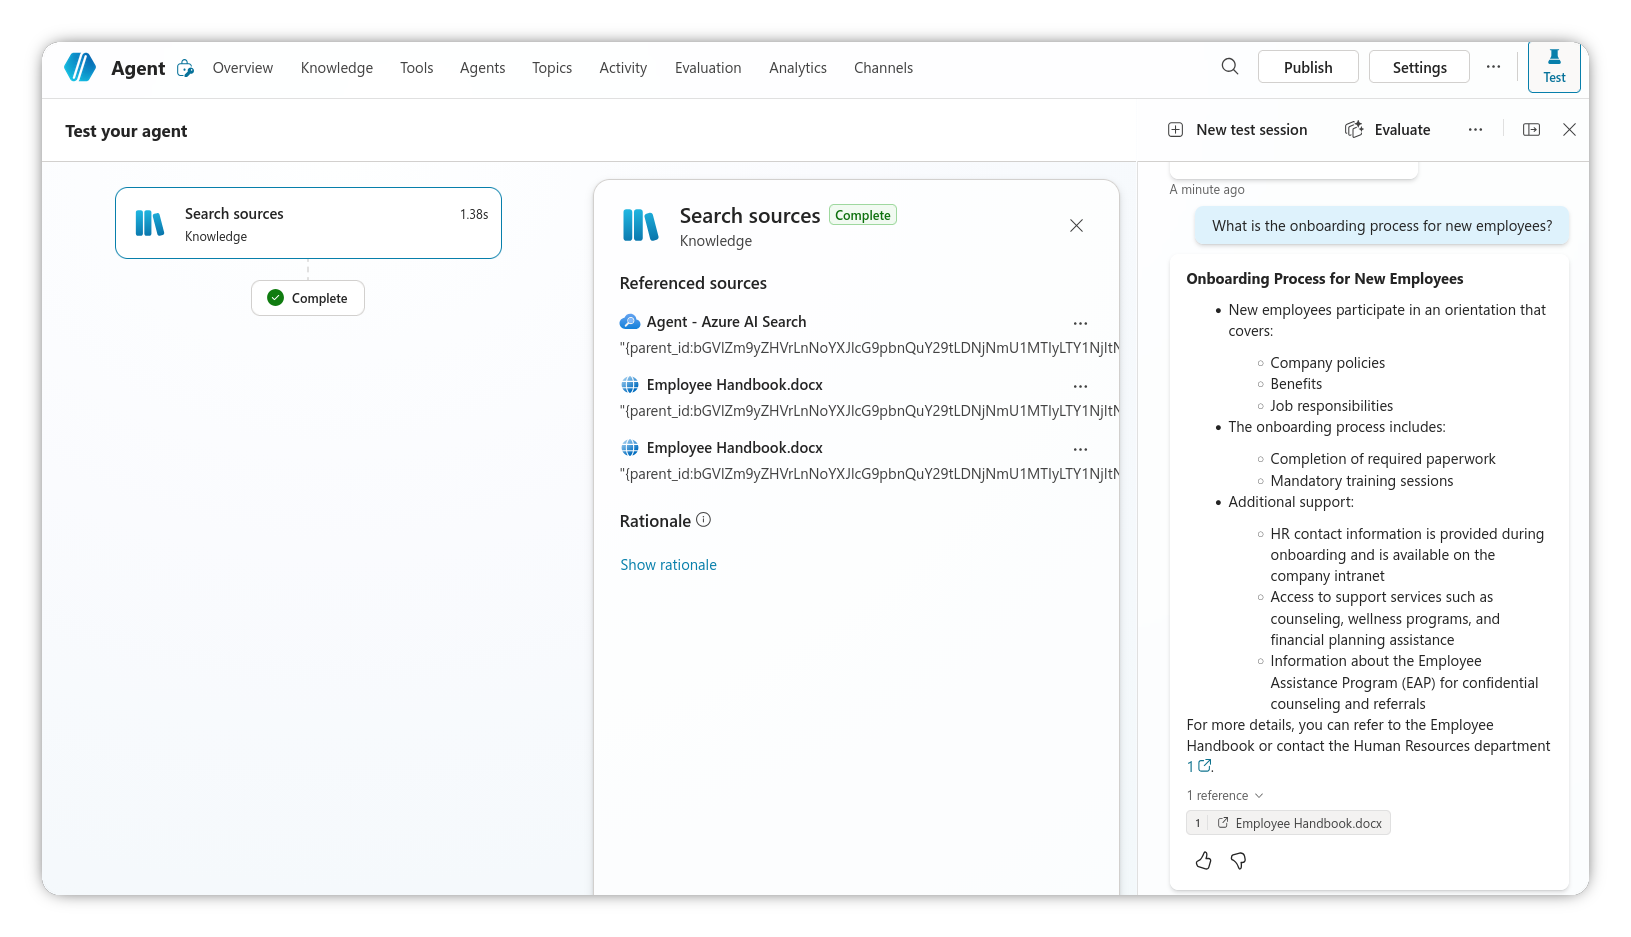
Recap
If you’ve followed the steps above, you should now have a Copilot agent that can query SharePoint content indexed in Azure AI Search, with citations linking back to the original documents in SharePoint. Being fully indexed and vectorised should also improve the relevance of the responses provided by the agent.