Introduction
Announced as part of Agent 365 at Microsoft Ignite 2025, MCP servers with access to Microsoft 365 services were announced. This was great news as up until then, you had to build your own servers to connect to Microsoft 365 services.
However, it was not clear if it was only possible in Copilot Studio agents, or if you could use it elsewhere, such as in declarative agents.
I’m here to report it is indeed possible - let me show you how.
Why you should care
Before we start with the how, let’s look at the why. Whilst it is possible to either build your own MCP servers, host them and handle authentication, this approach in most cases will be overkill.
In addition, you could also configure Microsoft Graph as an API, as outlined in my friend Reshmee’s post, but this is also quite a bit of work.
Prerequisites
- Access to Entra ID to be able to create an app registration
- Signed up for the Copilot Frontier program
Creating the Entra ID App Registration
For this example, I am going to create an app registration with access to SharePoint and OneDrive, including SharePoint lists. To keep it simple and repeatable, I am going to use Azure CLI to create it (if you don’t have access to Azure CLI, you can use the Azure Cloud Shell).
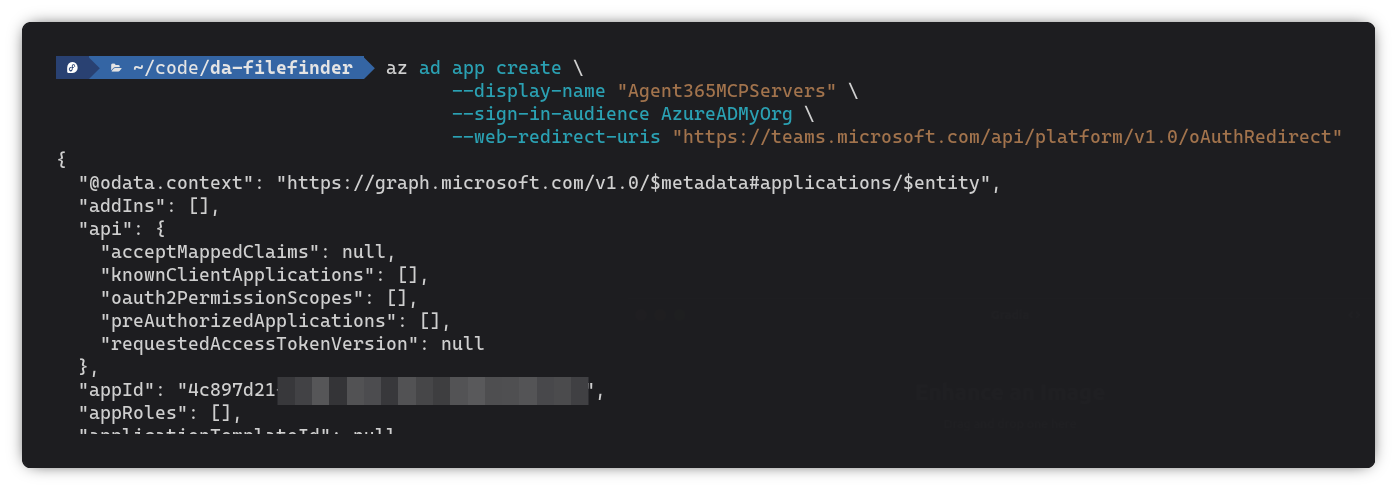
Create a new app registration:
- You can use a different
display-nameif you prefer
az ad app create \
  --display-name "Agent365MCPServers" \
  --sign-in-audience AzureADMyOrg \
  --web-redirect-uris "https://teams.microsoft.com/api/platform/v1.0/oAuthRedirect"
Take note of the appId value returned, as you will need it later.
Next, we need to get the client secret for the app registration — this is needed to authenticate on behalf of the user:
- Replace
{{AppId}}with theappIdvalue from a previous step
az ad app credential reset \
  --id {{AppId}} \
  --append
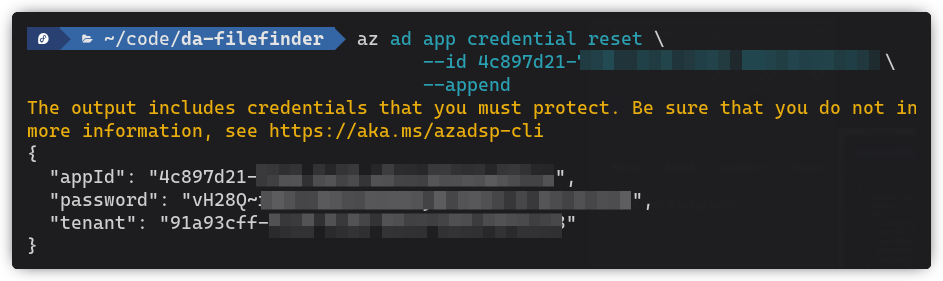
Take note of the password value returned, as you will need it later.
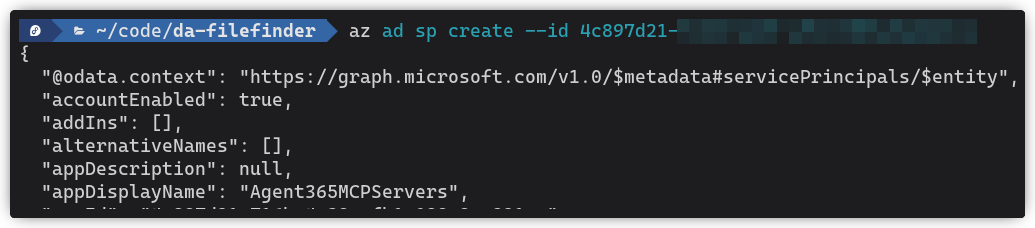
The next step is to create a service principal for the app registration:
- Replace
{{AppId}}with theappIdvalue from a previous step
az ad sp create --id {{AppId}}
We now need to assign the required API permissions to the app registration. For this example, I am using McpServers.SharepointLists.All and McpServers.OneDriveSharepoint.All:
- Replace
{{AppId}}with theappIdvalue from a previous step
az ad app permission add \
  --id {{AppId}} \
  --api ea9ffc3e-8a23-4a7d-836d-234d7c7565c1 \
  --api-permissions 8d00067e-ea97-437e-8eb7-9c09e2d9ceb7=Scope 45b74cfc-7a12-4589-8d26-781de38fbfcc=Scope
List of all available permissions currently
| Permission | Id |
|---|---|
| McpServers.D365ContactCenterAdmin.All | d83d751a-4da2-4af2-832d-6f24b8a38b9a |
| AgentTools.AgentBluePrint.Delete | d5aab012-d97a-4904-b559-0169ea76de67 |
| AgentTools.AgentBluePrint.Create | cb25532a-aed3-47a8-8065-616d45c92dc9 |
| AgentTools.UnpublishMCPServer.All | e7ed0e43-3c1b-43c5-b945-899d98804148 |
| AgentTools.PublishMCPServer.All | 72c23506-3119-407b-b721-5b124f624658 |
| AgentTools.ListMCPServers.All | 382c709b-439a-4a9f-af61-124c3a0260f6 |
| AgentTools.ListDataverseEnvironments.All | 7a65e3f8-ca92-496c-ae18-19aac858f4f5 |
| McpServers.M365Admin.All | 5db4c680-067f-482c-b68a-6c3be4088d34 |
| McpServers.DASearch.All | 6d5f0339-7183-455f-aa02-0913bd30a916 |
| McpServers.WebSearch.All | eeafec01-9533-424a-9ff6-6179b338278e |
| McpServers.Files.All | 965326d7-c2b4-4ae5-9833-a7286013fb2c |
| AgentTools.MOSEvents.All | 74c273e4-2ff8-436c-b04b-ee7629b06cb2 |
| McpServers.Admin365Graph.All | bacef632-20f6-44f0-b07a-0d4fdbf236f7 |
| McpServers.ERPAnalytics.All | 1a2a5c28-5fcf-415c-8b8b-56a87e766dba |
| McpServers.DataverseCustom.All | c1463966-a610-4d15-a74f-3dc191eb4f37 |
| McpServers.Dataverse.All | c82361df-5248-4308-ae97-a1fc509291f4 |
| McpServers.D365Service.All | e69104b3-1c54-40e3-8cac-ba981a24bbc8 |
| McpServers.D365Sales.All | 6d8f6be6-0dab-4c0f-b481-ba1d73227be5 |
| McpServers.Management.All | 570b1e31-b6a4-4aa7-b050-4267c418aacf |
| McpServersMetadata.Read.All | 59ccebf0-00a5-4d33-8769-cef7d7acb59d |
| McpServers.Developer.All | 041cabe0-7820-49b8-be02-b170d16559e2 |
| McpServers.CopilotMCP.All | 342a1c02-975d-4f22-bae9-56a200ca9fd0 |
| McpServers.OneDriveSharepoint.All | 45b74cfc-7a12-4589-8d26-781de38fbfcc |
| McpServers.Mail.All | be685e8e-277f-43ec-aff6-087fdca57ca3 |
| McpServers.Teams.All | 5efd4b9c-e459-40d4-a524-35db033b072f |
| McpServers.Me.All | 2ce6ce0f-4701-4b11-8087-5031f87ad5b9 |
| McpServers.Calendar.All | 75c3a580-2c8f-4906-adc6-ffa8601d78dc |
| McpServers.SharepointLists.All | 8d00067e-ea97-437e-8eb7-9c09e2d9ceb7 |
| McpServers.Knowledge.All | 798204a9-2b1d-4109-a2d6-3c641183c48c |
| McpServers.Excel.All | c80101f0-b7e0-4a85-b8c2-0c855aeced97 |
| McpServers.Word.All | 6f7b3c3c-d822-4164-b9ec-8bf520399d24 |
| McpServers.PowerPoint.All | 4ad939ce-e965-4562-93da-88c7e1a66fbc |
You can get the latest list of permissions by running the following command:
az ad sp show --id ea9ffc3e-8a23-4a7d-836d-234d7c7565c1 --query "oauth2PermissionScopes[].{Value:value, Id:id}" -o table

Storing credentials in Teams Dev Portal
Next, we need to store the credentials of the app registration in Teams Dev Portal, so that they can be used in the declarative agent. This way there is no need to hardcode them in the agent definition.
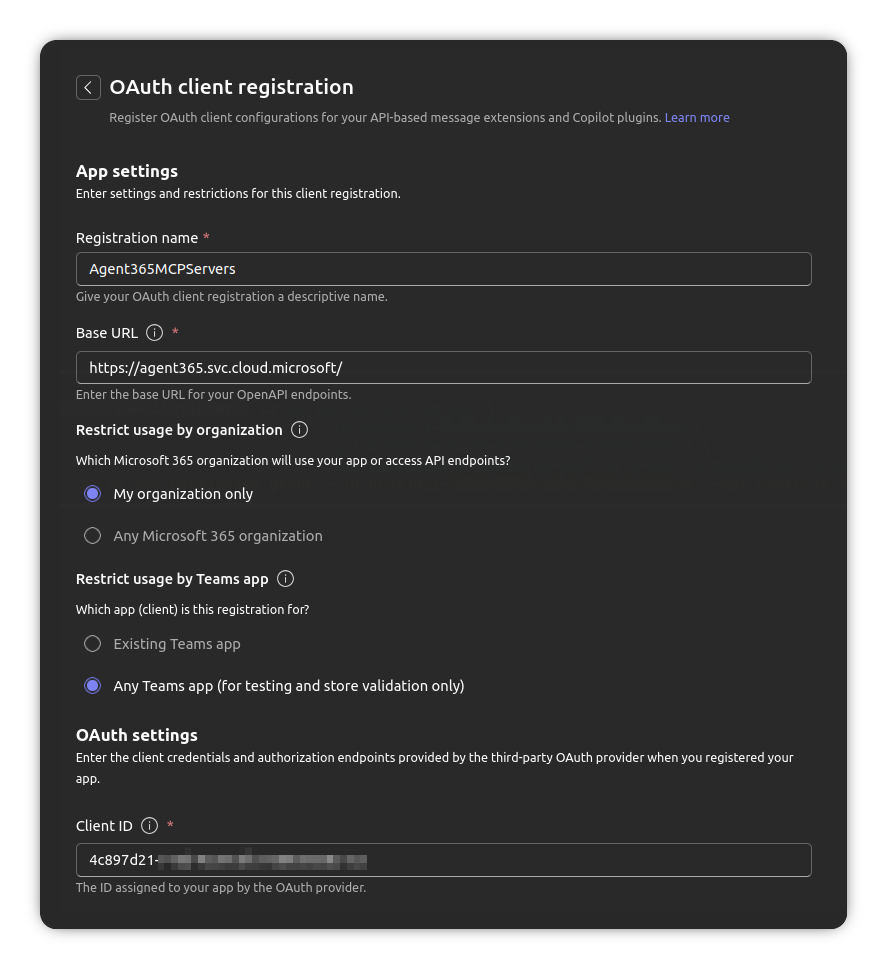
Go to Teams Dev Portal and go to Tools > OAuth client registration.
Click on Register client and fill in the details:
- Registration name: Agent365MCPServers (or any name you prefer)
- Base URL: https://agent365.svc.cloud.microsoft/
- Restrict usage by Teams app: Any Teams app (you can restrict it to a specific Teams app later if you prefer)
- Client ID: The
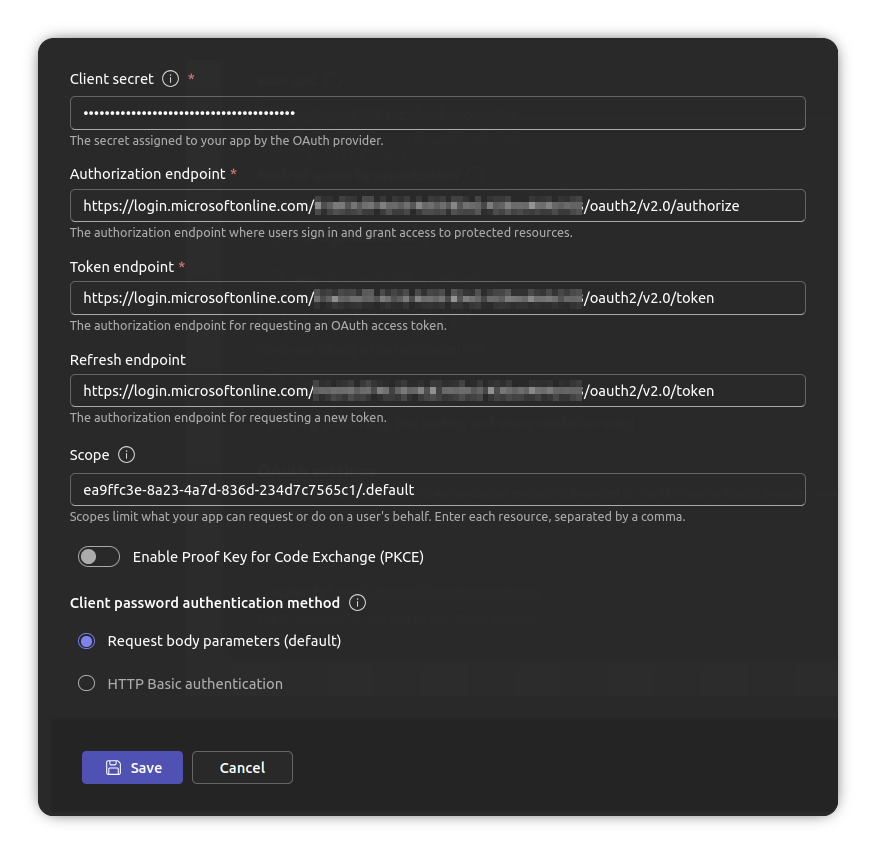
appIdvalue from the app registration created earlier - Client Secret: The
passwordvalue from the app registration created earlier - Authorization endpoint:
https://login.microsoftonline.com/{{tenantId}}/oauth2/v2.0/authorize(replace{{tenantId}}with your tenant ID) - Token endpoint:
https://login.microsoftonline.com/{{tenantId}}/oauth2/v2.0/token(replace{{tenantId}}with your tenant ID) - Refresh endpoint:
https://login.microsoftonline.com/{{tenantId}}/oauth2/v2.0/token(replace{{tenantId}}with your tenant ID) - Scopes:
ea9ffc3e-8a23-4a7d-836d-234d7c7565c1/.default - Enable PKCE: Unchecked
Click on Save and copy the OAuth client registration ID - you will need it later.
Creating the declarative agent
Now we are ready to create the declarative agent that will use the MCP server. I won’t go through the full steps of creating the agent, just what you need to add.
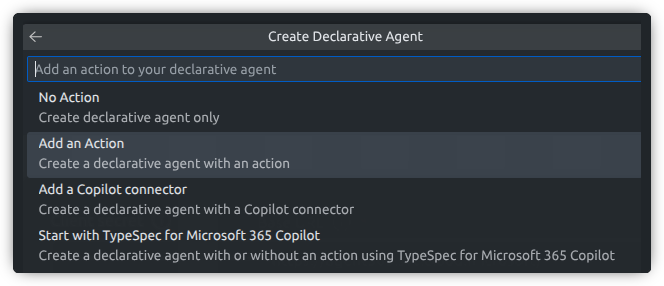
First, start by creating a new declarative agent in the M365 Agents Toolkit.
When asked choose Add an action
Set the action type to Start with an MCP server
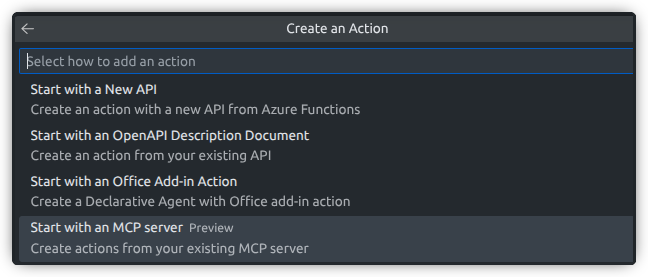
When prompted for the MCP server URL, use https://agent365.svc.cloud.microsoft/agents/servers/mcp_SharepointListsTools or the MCP server you wish to use.

Lastly, provide a location on your machine to store the agent and give it a name.
You may see an option to use TypeSpec - which I would normally recommend, but at the time of writing this post, MCP servers are not supported with TypeSpec agents.
Configuring MCP tools in the agent
With the agent scaffolded, the first part is to update the ai-plugin.json file to include the tools that the MCP server provides (and that you need).
You will need to see how the tools are named in the MCP server. You can do this by going to the Agent 365 MS Learn articles and looking for the tool names.
You will also need to make note of the parameters, what is required and what is optional and the data types.
To demonstrate, I will add the SharePoint list tools to the functions section of the ai-plugin.json file:
"functions": [
  {
    "name": "searchSitesByName",
    "description": "Search SharePoint sites by display name or partial URL (natural language).",
    "parameters": {
      "type": "object",
      "properties": {
        "search": {
          "type": "string",
          "description": "Display name or partial name/URL of the SharePoint site to search for"
        }
      },
      "required": [
        "search"
      ]
    }
  },
  {
    "name": "getSiteByPath",
    "description": "Resolve a SharePoint site by using its hostname and server-relative path.",
    "parameters": {
      "type": "object",
      "properties": {
        "hostname": {
          "type": "string",
          "description": "Host name of the SharePoint tenant (for example, contoso.sharepoint.com)"
        },
        "serverRelativePath": {
          "type": "string",
          "description": "Server-relative path to the site (for example, sites/Marketing)"
        }
      },
      "required": [
        "hostname",
        "serverRelativePath"
      ]
    }
  },
  {
    "name": "listLists",
    "description": "List all SharePoint lists on a site.",
    "parameters": {
      "type": "object",
      "properties": {
        "siteId": {
          "type": "string",
          "description": "The unique ID of the site"
        }
      },
      "required": [
        "siteId"
      ]
    }
  },
  {
    "name": "listListItems",
    "description": "List items from a SharePoint list.",
    "parameters": {
      "type": "object",
      "properties": {
        "siteId": {
          "type": "string",
          "description": "The unique ID of the site"
        },
        "listId": {
          "type": "string",
          "description": "The unique ID of the list"
        },
        "expand": {
          "type": "string",
          "description": "Optional OData expand (for example, fields)"
        },
        "top": {
          "type": "number",
          "description": "Optional page size"
        },
        "filter": {
          "type": "string",
          "description": "Optional OData filter expression"
        },
        "select": {
          "type": "string",
          "description": "Optional OData select clause"
        }
      },
      "required": [
        "siteId",
        "listId"
      ]
    }
  },
  {
    "name": "createList",
    "description": "Create a new SharePoint list on a site.",
    "parameters": {
      "type": "object",
      "properties": {
        "siteId": {
          "type": "string",
          "description": "The unique ID of the site"
        },
        "displayName": {
          "type": "string",
          "description": "Display name of the list"
        },
        "list": {
          "type": "string",
          "description": "JSON string with list info such as template (for example, genericList, documentLibrary, issueTracking)"
        }
      },
      "required": [
        "siteId",
        "displayName",
        "list"
      ]
    }
  },
  {
    "name": "createListItem",
    "description": "Create a new item in a SharePoint list.",
    "parameters": {
      "type": "object",
      "properties": {
        "siteId": {
          "type": "string",
          "description": "The unique ID of the site"
        },
        "listId": {
          "type": "string",
          "description": "The unique ID of the list"
        },
        "fields": {
          "type": "string",
          "description": "JSON string with field values for the list item (key/value map)"
        }
      },
      "required": [
        "siteId",
        "listId",
        "fields"
      ]
    }
  },
  {
    "name": "updateListItem",
    "description": "Update fields of an existing list item.",
    "parameters": {
      "type": "object",
      "properties": {
        "siteId": {
          "type": "string",
          "description": "The unique ID of the site"
        },
        "listId": {
          "type": "string",
          "description": "The unique ID of the list"
        },
        "itemId": {
          "type": "string",
          "description": "The unique ID of the list item"
        },
        "fields": {
          "type": "string",
          "description": "JSON string with field values to update (partial)"
        }
      },
      "required": [
        "siteId",
        "listId",
        "itemId",
        "fields"
      ]
    }
  },
  {
    "name": "deleteListItem",
    "description": "Delete a list item.",
    "parameters": {
      "type": "object",
      "properties": {
        "siteId": {
          "type": "string",
          "description": "The unique ID of the site"
        },
        "listId": {
          "type": "string",
          "description": "The unique ID of the list"
        },
        "itemId": {
          "type": "string",
          "description": "The unique ID of the list item"
        }
      },
      "required": [
        "siteId",
        "listId",
        "itemId"
      ]
    }
  },
  {
    "name": "listListColumns",
    "description": "List column definitions for a specific SharePoint list.",
    "parameters": {
      "type": "object",
      "properties": {
        "siteId": {
          "type": "string",
          "description": "The unique ID of the site"
        },
        "listId": {
          "type": "string",
          "description": "The unique ID of the list"
        }
      },
      "required": [
        "siteId",
        "listId"
      ]
    }
  },
  {
    "name": "listSubsites",
    "description": "List child sites (subsites) for a given site.",
    "parameters": {
      "type": "object",
      "properties": {
        "siteId": {
          "type": "string",
          "description": "The unique ID of the site"
        }
      },
      "required": [
        "siteId"
      ]
    }
  }
]
As I can’t find a way to automatically get the tool definitions, you will need to manually add the ones you need.
Configuring the MCP server in the agent
The second part is to update the runtimes section of the ai-plugin.json file to include the MCP server configuration. I am only using the SharePoint lists tools, so my configuration looks like this:
- Replace
{{OAuthClientRegistrationId}}with the OAuth client registration ID created earlier - If you wish to use a different MCP server, update the
urlaccordingly - The
run_for_functionsarray should include all the functions you added in the previous step
"runtimes": [
  {
    "type": "RemoteMCPServer",
    "auth": {
      "type": "OAuthPluginVault",
      "reference_id": "{{OAuthClientRegistrationId}}"
    },
    "spec": {
      "url": "https://agent365.svc.cloud.microsoft/agents/servers/mcp_SharepointListsTools"
    },
    "run_for_functions": [
      "searchSitesByName",
      "getSiteByPath",
      "listLists",
      "listListItems",
      "createList",
      "createListItem",
      "updateListItem",
      "deleteListItem",
      "listListColumns",
      "listSubsites"
    ]
  }
]
Testing the agent
You can now provision the agent in your tenant. Depending on your use case and scenario you may want to update the instructions and conversation starters.
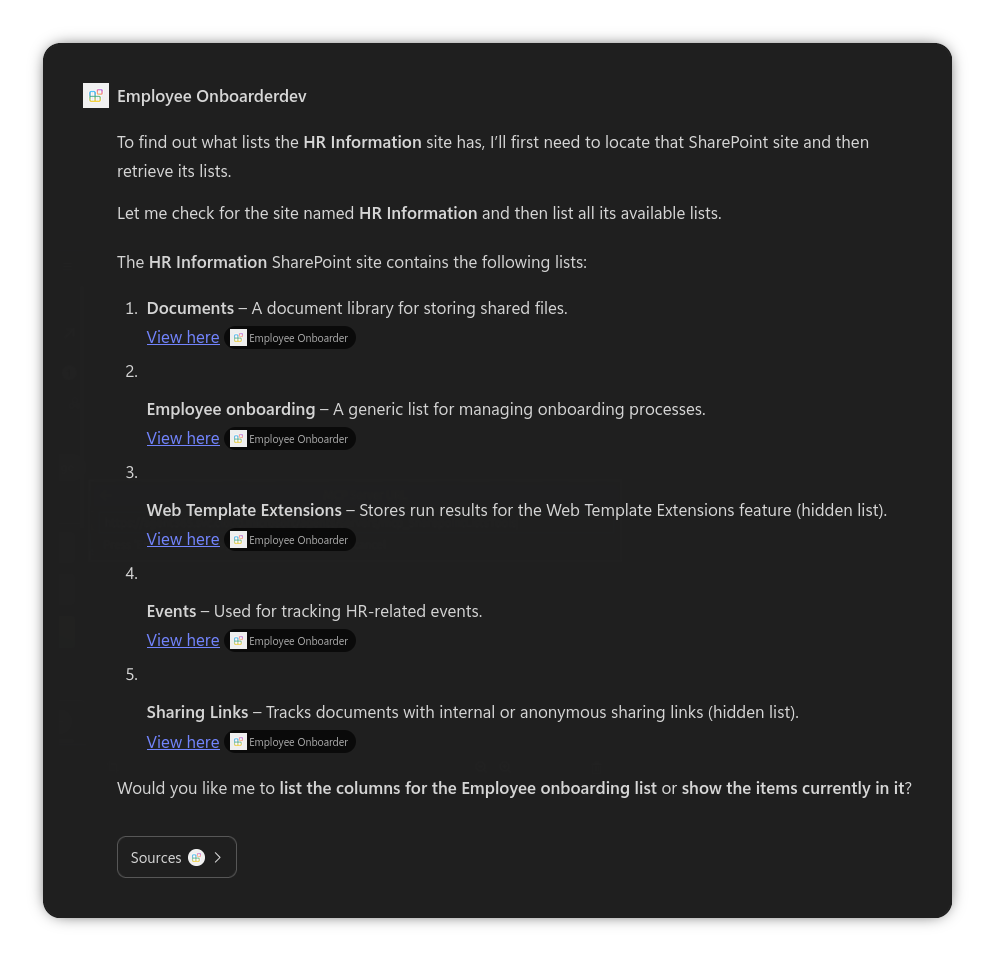
Now ask the agent a question. If it’s found a match against one of the tools, it will confirm you wish to use it (authentication may be required the first time).
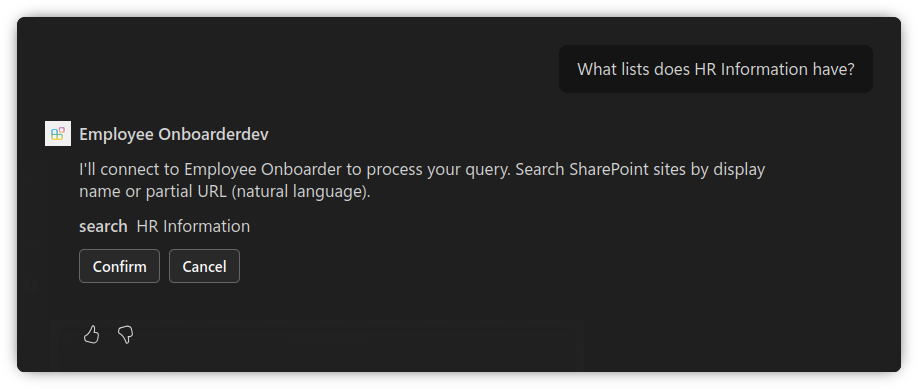
Once authenticated, the agent will use the MCP server to get the data from SharePoint.

Wrap up
In this post, I have shown you how to consume Agent 365 MCP servers in M365 Copilot declarative agents. This allows you to perform a lot of M365 service operations without having to build your own MCP server, or rely on Copilot Studio agents.